

Basement Hopper Window Replacement: Where to Start
For a basement hopper window replacement, measure the opening in several places and use the smallest width and height to choose a window that fits. Then remove the old unit, repair the opening, dry-fit and secure the new window, and seal it without blocking its drainage paths. Hire a pro if the masonry is damaged, the opening needs to be enlarged, or the basement needs an emergency exit window. A standard small hopper window usually does not meet egress requirements.
At Rooster Windows and Doors, LLC, our team has more than two decades of combined experience installing residential windows and doors in Lake, Cook, and McHenry counties, and we’ll help you decide which basement hopper window replacement steps you can tackle yourself.
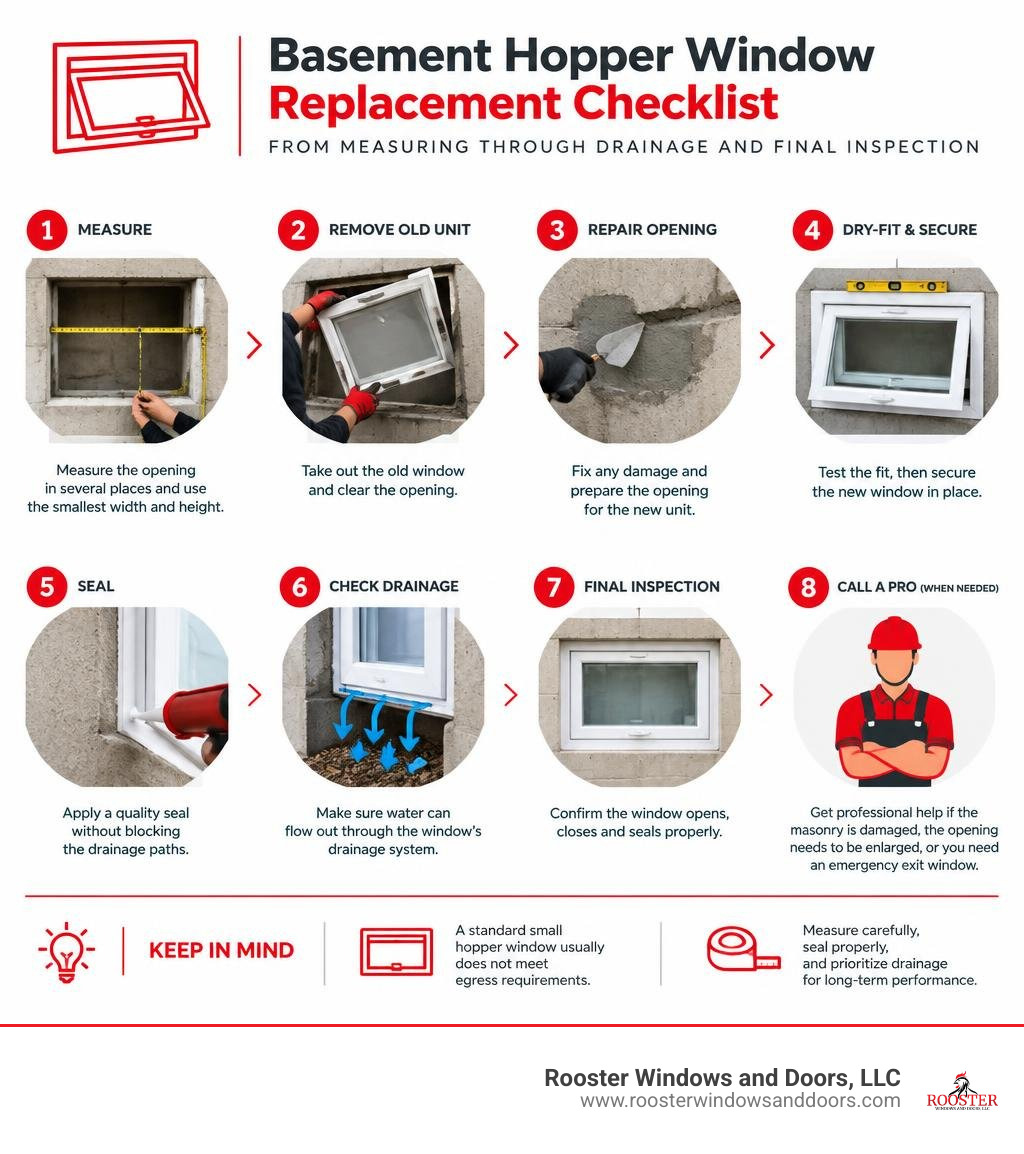
Basement hopper window replacement terms explained:
Understanding Basement Hopper Windows: Anatomy, Sizing, and Efficiency
Basement windows operate under far harsher conditions than windows on upper floors. Positioned close to grade level, they face soil moisture, splashing rainwater, heavy snow accumulation, and shifting ground temperatures. Understanding how a hopper window functions helps you evaluate whether your existing units are performing properly or actively wasting energy and inviting water damage.
A hopper window is defined by its bottom-hinged design. Unlike an awning window that hinges at the top and swings outward, a hopper window tilts inward into the basement living space from the top rail. This orientation creates an upward airflow dynamic that pulls fresh air inside while directing damp, stagnant basement air out. The inward tilt also prevents exterior obstructions—such as window well walls or low bushes—from interfering with the sash operation.
Hopper Window Mechanics and Key Indicators for Replacement
The mechanical hardware of a hopper window is relatively simple, featuring bottom pivot hinges, side friction arms (or heavy-duty support chains), and a central or dual cam-locking latch at the top. When closed, the top latch pulls the sash firmly against the perimeter weatherstripping to create an airtight seal against the elements.
Over years of service, basement windows inevitably degrade. Look for these clear warning signs that indicate your windows are due for an upgrade:
- Rusted Steel Frames: Many older homes throughout Chicagoland feature original steel-framed basement utility windows set directly into wet concrete. Over time, ground moisture causes the metal to rust, expand, and spall the surrounding concrete, making the window impossible to open or seal.
- Rotted Wood Bucks and Sills: Traditional installations utilized wood framing (bucks) around the masonry opening. Constant contact with damp foundation walls leads to wood rot, inviting termites and carpenter ants while compromising structural support.
- Drafts and Failing Weatherstripping: Brittle, cracked, or missing weatherstripping allows cold winter drafts and humid summer air to enter freely, driving up heating and cooling bills.
- Condensation and Fogged Glass: If you notice permanent fog or water droplets trapped between double panes, the thermal perimeter seal has failed. This eliminates the insulating gas fill and drastically reduces thermal performance.
- Difficult Operation or Broken Latches: A warped sash or corroded hinge hardware makes emergency operation difficult and compromises your home’s ground-level security.
Before ordering a replacement, accurately measuring basement window dimensions is critical to avoid costly sizing mismatches.
Sizing Dimensions, Material Choices, and Energy-Saving Glass
Standard replacement hopper windows come in common off-the-shelf masonry sizes. The most frequent rough opening dimensions include widths from 30 to 36 inches and heights from 12 to 24 inches. The two most common standard sizes found in residential basements are 32″ x 16″ and 32″ x 20″.
Selecting the right frame material ensures your new basement window survives below-grade moisture levels:
| Frame Material | Cost Range (Unit Only) | Moisture Resistance | Maintenance Needs | Energy Performance |
|---|---|---|---|---|
| Vinyl (uPVC) | $50 – $200 | Exceptional (100% waterproof) | Minimal (wipe clean) | Excellent (multi-chambered) |
| Aluminum | $100 – $250 | Moderate (can corrode over time) | Low | Poor to Fair (conducts cold) |
| Wood | $200 – $400+ | Poor (prone to rot and swelling) | High (regular paint/sealant) | Good (natural insulator) |
| Composite / Fiberglass | $250 – $500 | Exceptional | Very Low | Superior |
Vinyl remains the industry standard and most sensible choice for residential basements. Extruded vinyl will not rot, rust, pit, or support mold growth, and welded corner seams prevent water from penetrating the internal framing.
Glass selection is equally vital. In our northern climate, single-pane basement glass is a major source of home heat loss and interior frost buildup. Modern double-pane insulated glass units (IGUs) with Low-E (low-emissivity) coatings reflect infrared heat back into your basement during winter while keeping summer radiant heat outside. When paired with an inert argon gas fill between the panes, a quality hopper window achieves a U-factor between 0.23 and 0.28, cutting heat loss through the opening by up to 30%. For non-standard foundations, checking a comprehensive guide on basement hopper window sizing ensures you select the correct dimensions for your foundation style.
Complete Guide to Basement Hopper Window Replacement Costs and Codes
Budgeting for your window upgrade involves understanding the clear price differences between a direct pocket replacement and a complete foundation alteration.
Standard Replacement vs. Full Egress Conversion
When replacing an existing window within its original masonry opening (a “replaced-in-place” or pocket replacement), the project is straightforward and cost-effective. A standard vinyl hopper window unit typically runs between $50 and $300 depending on dimensions, glass coatings, and custom privacy textures. Professional installation labor generally adds $150 to $500 per opening, bringing the typical total cost to $250 to $700 per window. Upgrading from standard single-pane utility glass to an insulated double-pane Low-E unit usually adds only $30 to $80 per window—an investment that quickly pays for itself in reduced winter heating bills.
In contrast, if you are finishing a basement and adding a bedroom or dedicated living area, standard hopper windows cannot legally serve as your required emergency exit. Converting a small opening into a code-compliant egress opening requires saw-cutting concrete, installing structural steel lintels, excavating soil, and installing an oversized corrugated or masonry window well with an integrated escape ladder.
| Replacement Type | Typical Unit Cost | Labor & Structural Cost | Total Estimated Cost | Egress Code Compliant? |
|---|---|---|---|---|
| Standard Hopper Pocket Replacement | $50 – $300 | $150 – $500 | $250 – $700 | No (Ventilation/Light Only) |
| Custom High-Efficiency Hopper | $300 – $550 | $200 – $450 | $500 – $1,000 | No |
| Full Egress Window Conversion | $400 – $1,200 | $2,000 – $5,000 | $2,500 – $6,000+ | Yes (Meets IRC Standards) |
For detailed breakdown examples and budgeting expectations, reviewing an analysis on Basement Hopper Window Replacement: Cost & How-To helps outline line-item costs for your upcoming project.
Building Codes, Window Wells, and Water Drainage Essentials
Building codes protect homeowner safety. According to the International Residential Code (IRC), any habitable basement space—especially dedicated bedrooms—must feature at least one emergency escape and rescue opening (egress). An IRC-compliant egress window must meet these strict criteria:
- Minimum Net Clear Opening: 5.7 square feet (5.0 sq. ft. for grade-floor openings).
- Minimum Clear Opening Height: 24 inches.
- Minimum Clear Opening Width: 20 inches.
- Maximum Sill Height: No more than 44 inches above the finished basement floor.
- Operational Ease: Operable from the inside without keys, tools, or special knowledge.
Standard basement hopper windows rarely achieve 5.7 square feet of clear opening space due to their low profile. Consequently, they are classified as light-and-ventilation windows rather than emergency exits. If your basement already has a primary egress point (such as an egress casement or walkout door), hopper windows serve as the ideal secondary solution for natural light and passive airflow. Before starting structural work, always review local municipal requirements, such as the guidelines outlined for Windows & Glass Doors | Buffalo Grove, IL, to ensure all permit rules are respected.
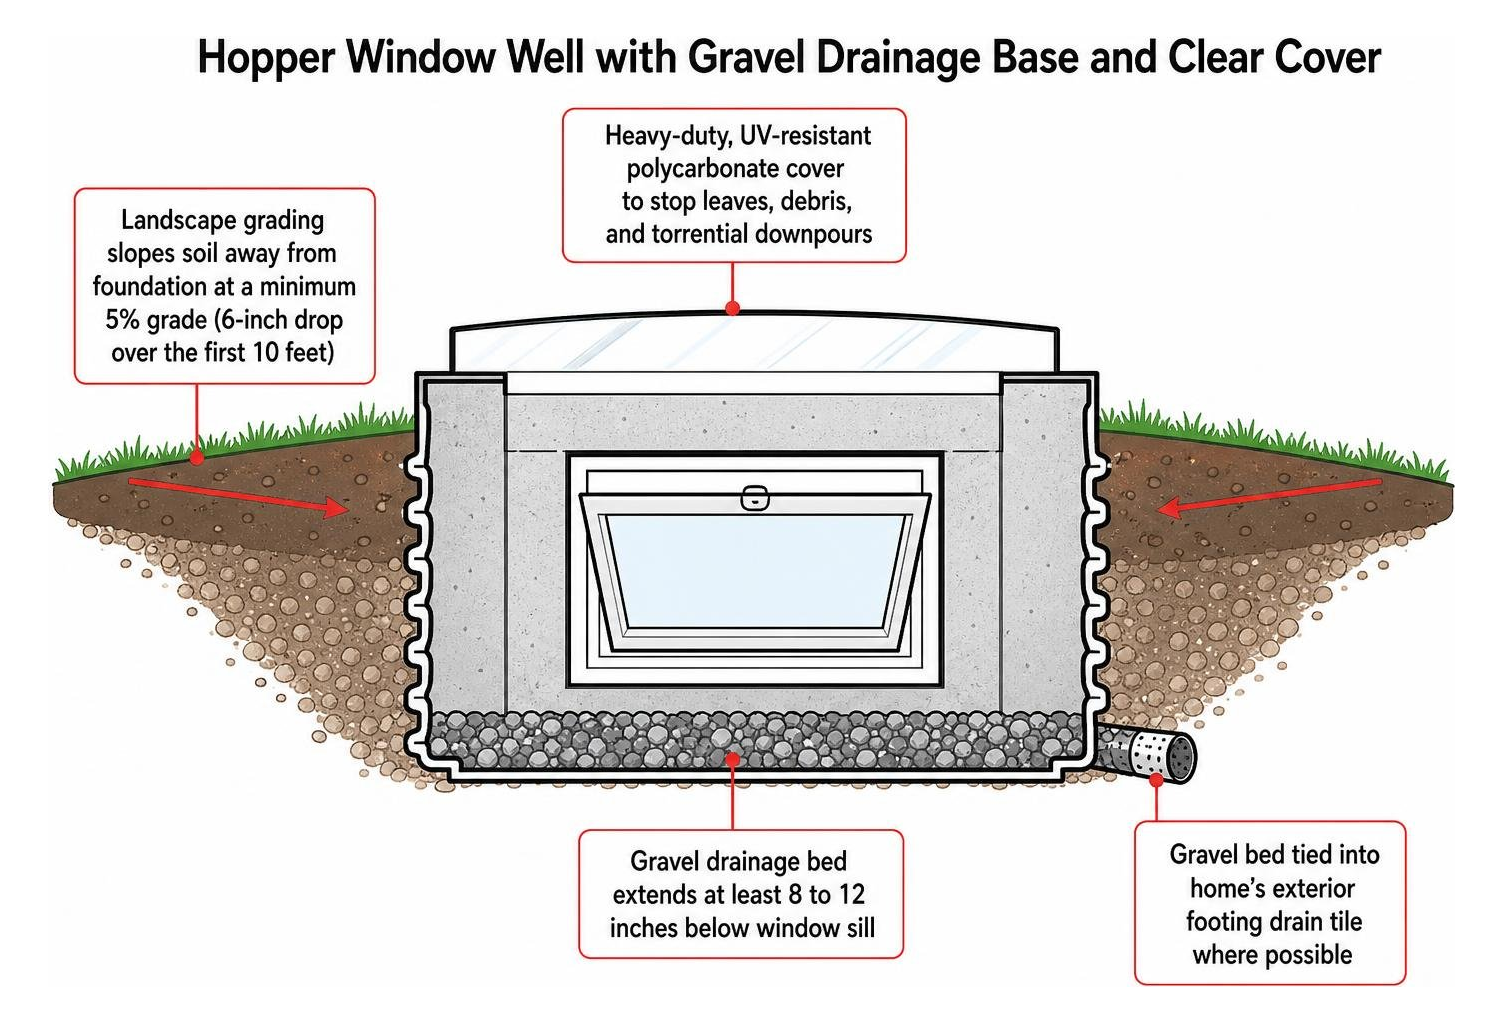
Water management is the single most critical factor in below-grade installations. A window installed below the exterior soil line requires a properly designed window well. The well should feature:
- A dedicated gravel drainage bed extending at least 8 to 12 inches below the window sill, tied into the home’s exterior footing drain tile where possible.
- Proper landscape grading that slopes soil away from the foundation at a minimum 5% grade (a 6-inch drop over the first 10 feet).
- A heavy-duty, UV-resistant polycarbonate window well cover to stop leaves, debris, and torrential downpours from filling the well like a fish tank.
To protect your foundation and drywall from moisture intrusion, follow proven techniques to waterproof and seal your basement windows during the rough opening preparation stage.
How to Install a Replacement Basement Hopper Window
Replacing a basement hopper window requires precision masonry work, proper fastener selection, and strict weatherproofing. Here is the step-by-step process our technicians use for a clean, weather-tight installation.
Required Tools, Fasteners, and Masonry Prep
Before beginning, gather these essential tools and materials:
- Safety Gear: Heavy work gloves, impact-rated eye protection, hearing protection, and an N95 dust mask.
- Demolition Tools: Angle grinder equipped with a diamond or metal-cutting wheel, cold masonry chisel, 3 lb hand sledgehammer, and a reciprocating saw.
- Carpentry & Masonry Tools: 2-foot level, tape measure, hammer drill with masonry bits, cordless impact driver, and a caulking gun.
- Installation Materials: Replacement vinyl hopper window (sized 1/4″ to 1/2″ smaller than the masonry opening), 2×8 pressure-treated lumber (for sills), composite shims, masonry screws (Tapcons), low-expansion polyurethane window/door foam, commercial-grade polyurethane or 100% silicone exterior sealant, and a breathable siloxane masonry penetrating sealer.
Safety Note: If your home was built before 1978, the existing window frame or adjacent wood trim may contain lead paint. Use wet-sanding methods, HEPA-filtered containment, and appropriate respiratory protection to prevent airborne lead dust.
Step-by-Step DIY Basement Hopper Window Replacement
Step 1: Remove the Old Sash and Frame
Open the old hopper window, release the side friction arms or pivot clips, and remove the movable glass sash. If dealing with an old steel basement buck embedded in poured concrete, use an angle grinder with a metal cutoff wheel to cut completely through the bottom and side steel frame channels. Use a pry bar and cold chisel to collapse the metal frame inward away from the concrete. If dealing with an old wood frame, cut through the side jambs with a reciprocating saw and pry the rotted buck away from the foundation.
Step 2: Clean and Treat the Masonry Opening
Chisel away loose mortar, concrete burrs, and old hardened caulking until you have a smooth, solid masonry surface. Sweep away all fine dust and vacuum the opening thoroughly. Generously coat the raw concrete perimeter with a breathable siloxane masonry sealer until saturated. This chemical barrier prevents ground moisture from wicking through porous concrete directly into your new window frame.
Step 3: Fabricate and Install the Sloped Sill
To guarantee positive water runoff, install a pressure-treated 2x sill plate along the bottom of the concrete opening. Rip the sill on a table saw with a 5-degree to 10-degree downward exterior slope. The sill should project 1/4″ to 1/2″ beyond the exterior concrete wall. Apply heavy beads of exterior adhesive sealant beneath the wood, level it crosswise, bore pilot holes into the concrete using a hammer drill, and fasten the sill securely using countersunk masonry screws.
Step 4: Dry-Fit and Level the Window
Set the new vinyl hopper window into the rough opening on top of the sloped sill. Place a 2-foot level across the top rail and along the side jambs. Check both diagonal measurements from corner to corner; they must be equal within 1/8 inch to ensure the frame is perfectly square. Insert composite shims behind the mounting hole locations on the side jambs until the window is plumb, level, and centered. Never force a tight window into an out-of-square opening, as bowing the frame will prevent the sash from latching smoothly.
Step 5: Fasten the Frame
Open the hopper sash to access the pre-drilled side installation holes. Drive corrosion-resistant masonry screws or wood screws through the side jambs into your mounting bucks or concrete wall. Tighten the fasteners until snug against the vinyl, but do not over-drive them; over-torquing will distort the frame channels and break the perimeter seal. Re-check the sash operation to verify that the latches engage freely without binding.
Step 6: Insulate and Apply Perimeter Sealant
From the interior, insert the straw of your low-expansion window and door foam into the gap between the window frame and masonry. Fill the cavity approximately 50%, allowing the foam to expand gently without bowing the vinyl frame. Once cured, trim away excess foam flush with the wall.
On the exterior, apply a continuous 3/8-inch bead of high-grade polyurethane sealant along the top and two vertical sides where the vinyl frame meets the foundation.
Critical Rule: Never seal the exterior bottom edge of the window sill. The bottom edge must remain unsealed to allow any incidental water entering the frame track to escape outward through the integrated sill weep holes. Sealing the bottom traps water against the frame, leading to interior leaks and winter freeze-thaw damage.
For a deeper dive into preparation and leveling techniques, review our complete basement window installation guide for additional trade insights.
DIY vs. Hiring a Professional Contractor
Deciding whether to tackle your basement window replacement as a weekend DIY project or partner with a professional window replacement specialist comes down to tools, physical effort, and structural risk tolerance.
Evaluating the DIY Approach: Pros, Cons, and Common Pitfalls
For handy homeowners with carpentry and masonry experience, replacing a standard basement hopper window offers immediate labor cost savings. However, working on below-grade masonry comes with unique challenges:
- Masonry Tool Overhead: Removing rusted steel frames or cutting concrete requires specialized heavy tools—such as angle grinders, rotary hammer drills, and masonry chisels—that many DIYers do not own.
- Bowed Frames from Incorrect Foam: Using standard high-expansion spray foam (such as standard expanding gap fillers) exerts immense pressure as it cures, warping vinyl window jambs inward. This prevents the hopper sash from closing or locking securely. Always use certified low-expansion formula.
- Water Intrusion and Drainage Failures: Misunderstanding weep hole dynamics or failing to slope the exterior sill can redirect storm runoff straight into your basement framing, causing hidden mold growth.
- Improper Masonry Fastening: Stripping masonry screw pilot holes in aging concrete compromises window retention and air sealing.
Deciding Between DIY and Pro Basement Hopper Window Replacement
Consider professional installation if:
- Your foundation exhibits extensive spalling, cracked block work, or structural crumbling around the window header.
- You are modifying or enlarging the opening, which requires diamond-blade concrete sawing and structural steel reinforcement.
- You want custom factory-built dimensions that maximize visible daylight without requiring clumsy filler boards.
- You prefer the peace of mind that comes with complete workmanship guarantees and manufacturer warranty protection.
Professional installers complete pocket replacements in hours, ensure total airtight perimeter seals, and handle disposal of heavy steel, broken glass, and concrete debris. If you are comparing installation options, our guide on hiring window replacement pros outlines key questions to ask potential contractors before signing an agreement.
Frequently Asked Questions About Basement Hopper Windows
Do standard basement hopper windows meet IRC egress requirements?
No. Standard basement hopper windows are designed for natural lighting and ventilation, typically offering clear opening areas between 2.0 and 4.2 square feet. The International Residential Code (IRC) requires a minimum net clear opening of 5.7 square feet (24 inches minimum clear height, 20 inches minimum clear width) for emergency escape in finished basements and bedrooms. Standard hopper windows can only be installed in unfinished utility areas or in finished basements that already feature an existing, code-compliant egress window or exterior exit door.
How much does it cost to replace a basement hopper window?
A standard replaced-in-place basement hopper window costs $250 to $700 total per window. The vinyl window unit itself runs between $50 and $300, while professional labor typically adds $150 to $500. Upgrading to high-efficiency Low-E glass with argon gas insulation adds roughly $30 to $80 per unit. In contrast, enlarging the masonry opening to install a full egress-compliant window system costs between $2,500 and $6,000 due to concrete cutting, excavation, and window well construction.
Why shouldn’t you seal the exterior sill of a basement window?
You should never caulk or seal the exterior bottom edge where the window sill meets the foundation. Hopper windows are engineered with internal water management channels and exterior weep holes designed to direct incidental rainwater and glass condensation outward. Sealing the exterior sill blocks these weep pathways, trapping water inside the wall assembly. During freezing weather, trapped water expands, cracking masonry mortar joints and forcing moisture into your basement interior. Exterior sealant should be applied along the top header and two vertical side jambs only.
Conclusion
Upgrading failing, drafty basement hopper windows transforms your lower level from a damp, chilly storage area into a bright, comfortable, and energy-efficient living environment. High-performance vinyl frames eliminate maintenance headaches, while modern Low-E insulated glass stops heat loss and lowers monthly utility expenses. Whether you choose to tackle a straightforward DIY replacement or enlist expert help for tricky masonry openings, ensuring proper water drainage and airtight sealing will protect your foundation for decades to come.
Ready to upgrade your home with durable, weather-tight windows? Contact the team at Rooster Windows and Doors, LLC to explore our full selection of precision-engineered custom hopper windows and schedule your professional installation across the greater Chicago area today.
