

Why Installing Windows in a Basement Is Worth Getting Right
Installing windows in a basement is one of the highest-impact upgrades you can make to your home. Here’s a quick overview of what the process involves:
- Choose the right window type – egress, slider, awning, or hopper
- Measure the rough opening – width and height should be ~1/2″ larger than the window unit
- Prepare the opening – clean masonry, check for plumb, level, and square
- Dry fit and secure the window – use shims, masonry screws, and low-expansion foam
- Seal and flash – apply flashing tape and silicone caulk to keep moisture out
- Meet code requirements – egress windows need a minimum 5.7 sq ft net clear opening, 20″ wide, 24″ tall, sill no higher than 44″ from the floor
A properly installed basement window does more than let in light. It improves ventilation, boosts energy efficiency, and – if it meets egress code – can turn an unfinished room into a legal bedroom, adding as much as $21,000 in resale value.
But get it wrong, and you’re looking at water damage, drafts, failed inspections, or worse – a window that pops out in a storm.
This guide walks you through every step, from choosing the right style to sealing it tight.
I’m Piotr Wilk, owner of Rooster Windows and Doors, LLC, with over two decades of hands-on experience installing windows in a basement and throughout homes across the Chicagoland area. Whether you’re tackling this yourself or planning to call in a pro, this guide gives you everything you need to do it right.

Installing windows in a basement terms at a glance:
Choosing the Right Style for Installing Windows in a Basement
Selecting the right window is about more than just aesthetics; it’s about functionality, safety, and meeting the specific needs of a below-grade environment. Basements are naturally prone to moisture and limited airflow, so the window you choose needs to work hard.
Egress Windows
If you are finishing a basement to include a bedroom or a legal living space, egress windows are non-negotiable. These are large enough to serve as an emergency exit. In the Chicagoland area, from Aurora to Libertyville, local codes follow the International Residential Code (IRC), which mandates specific dimensions for these lifesavers.
Slider Windows
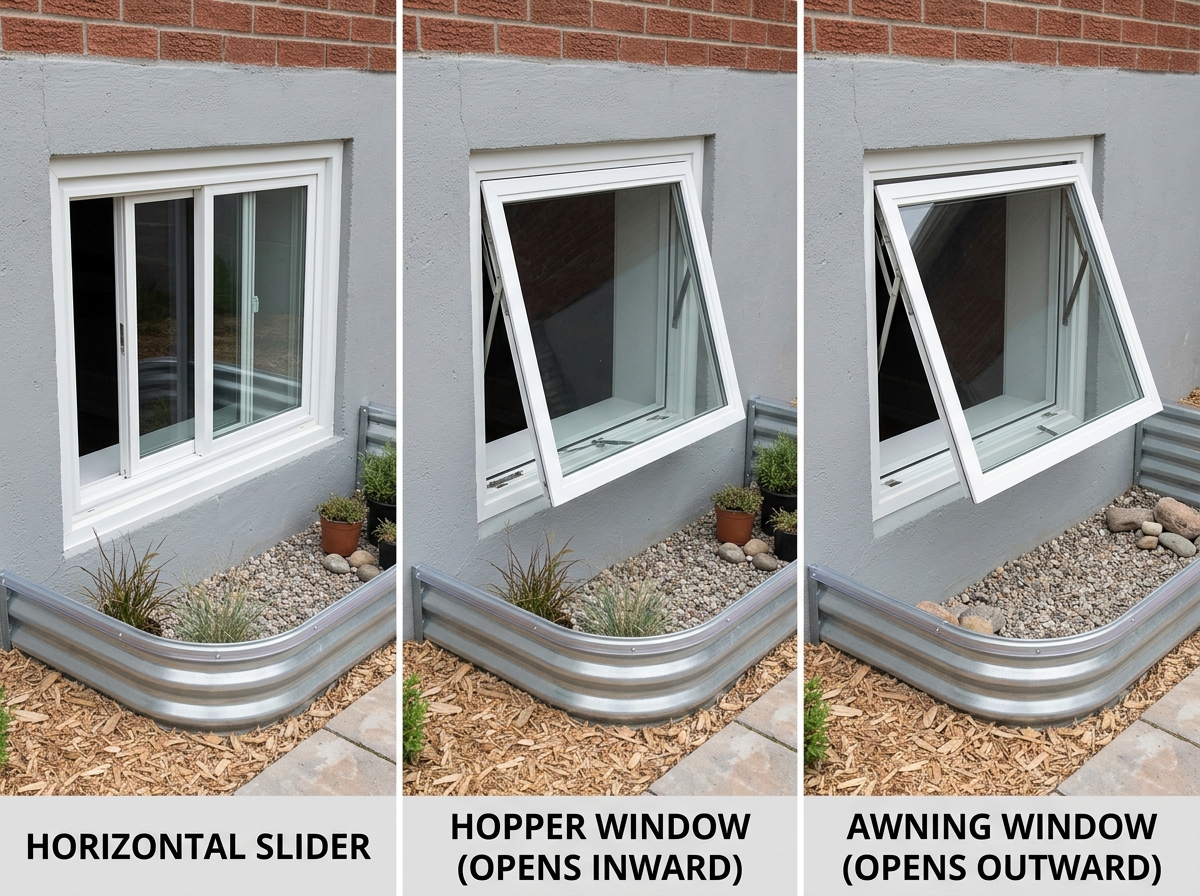
These are the most common choice for installing windows in a basement when egress isn’t the primary goal. They slide horizontally, making them easy to operate even in tight spaces. They provide excellent ventilation and are relatively low-maintenance.
Awning and Hopper Windows
- Awning Windows: Hinged at the top and opening outward. These are fantastic because they can remain open during a light rain without letting water into your basement.
- Hopper Windows: Hinged at the bottom and opening inward. These are the “classic” basement window. They are great for small openings but can sometimes interfere with interior furniture or window treatments.
| Window Type | Light Levels | Airflow | Emergency Exit? |
|---|---|---|---|
| Egress | High | Excellent | Yes (Required) |
| Slider | Medium | High | Only if sized for it |
| Awning | Medium | Medium | No |
| Hopper | Low | Medium | No |
For a deeper dive into which model fits your home, check out our more info about windows for basements.
Essential Tools and Preparation for Your Project
Before you pick up a hammer, you need to ensure your “rough opening”—the hole in your foundation—is ready. In our experience working in places like Naperville and Schaumburg, we’ve seen many DIY projects hit a wall because the prep work was rushed.
The Tool Kit
To do this right, you’ll need:
- Safety glasses and heavy-duty gloves
- Hammer and pry bar (for removing the old window)
- Level and tape measure
- Hammer drill with masonry bits
- Masonry screws (like Tapcons)
- Rot-resistant shims (plastic is better than wood for basements)
- Low-expansion spray foam (specifically for windows/doors)
- High-quality silicone sealant and flashing tape
Measuring and Squaring
You must measure the width and height in at least three places. Your new window should be roughly 1/2 inch smaller than the smallest measurement to allow for squaring and insulation. A critical step is measuring diagonals. Measure from the top-left corner to the bottom-right, then vice versa. If the numbers are within 1/8 inch of each other, your opening is square. If not, you’ll need those shims to compensate.
Proper insulation starts here. According to the Energy Star guide on air-sealed, insulated basements, preventing air leakage at the window frame is vital for maintaining a dry, comfortable space. For more on getting these numbers right, see our complete guide to basement window dimensions.
Step-by-Step Instructions for Installing Windows in a Basement
Ready to get your hands dirty? Follow these steps for a standard replacement installation.
1. Remove the Old Window
Start by removing the interior trim. Use your pry bar to carefully pop out the old sash. If it’s an old steel frame cast into the concrete, you may need a reciprocating saw to cut the frame and a sledgehammer to gently tap it out. Pro tip: Wear eye protection; old glass and metal shards are no joke.
2. Clean the Masonry
Scrape away old caulk, loose mortar, and debris. Vacuum the opening. You want a clean, smooth surface for the sealant to bond to. If the concrete is uneven, you might need to apply a thin layer of mortar to create a level sill.
3. Dry Fit the New Window
Place the window in the opening before applying any adhesive. Check for “plumb” (vertical) and “level” (horizontal). This is where you determine where your shims will go. The window should be centered with an even gap on all sides.
4. Apply Sealant and Fasten
Apply a thick bead of silicone sealant to the “blind stop” or the back of the window flange. Press the window into place. Drill pilot holes through the window frame into the masonry using your hammer drill. Drive your masonry screws through the shims and into the wall. Do not over-tighten, as this can bow the vinyl frame.
For those tackling a larger escape window project, follow our step-by-step guide to egress window installation.
Ensuring a Proper Seal When Installing Windows in a Basement
Once the window is physically secured, the battle against the elements begins. We recommend using a backer rod for gaps wider than 1/4 inch before applying caulk. This provides “two-point adhesion” and prevents the caulk from cracking.
Fill the remaining gap between the window frame and the rough opening with low-expansion spray foam. Standard spray foam expands too much and can actually warp your window frame, making it impossible to open. Once cured, trim the excess and apply flashing tape to the exterior for a secondary moisture barrier. This prevents “thermal bridging,” where cold air travels through the frame into your warm home. Learn more at no more drips: how to waterproof and seal basement windows.
Meeting Building Codes for Installing Windows in a Basement
In Illinois, safety is paramount. If you are installing windows in a basement intended for living, you must adhere to IRC standards:
- Net Clear Opening: Minimum 5.7 square feet.
- Opening Height: Minimum 24 inches.
- Opening Width: Minimum 20 inches.
- Sill Height: No more than 44 inches from the finished floor.
If your window is higher than 44 inches, you’ll need a permanently attached step or ladder. Don’t get caught out by inspectors; read our guide on understanding the 5.7 sq ft egress window rule.
Common Mistakes and Moisture Management
The biggest enemy of a basement is water. Most “DIY fails” we see in Waukegan or Elgin aren’t because of the window itself, but because of how the surrounding area was handled.
The Role of Window Wells
If your window is below grade, you need a window well. This well must be at least 3 feet wide and allow the window to open fully.
- Drainage: The bottom of the well should be filled with at least 12 inches of clean gravel. Ideally, a drainage pipe should connect the well to your home’s perimeter drain (weeping tile).
- Grading: Ensure the soil outside the well slopes away from the house at a rate of 1 inch per foot for at least 6 feet.
Weep Holes
Never, ever caulk over the weep holes at the bottom of your window frame. These are designed to let internal condensation escape. If you plug them, that water will back up into your walls, leading to mold and rot. For more on keeping your foundation dry, refer to the Water Management of Existing Basement Floor resource. You might also consider our guide to basement window covers to keep debris and snow out of your wells.
Frequently Asked Questions about Basement Windows
Is it hard to install basement windows myself?
It depends on the scope. Replacing an existing window in a wood frame is a solid intermediate DIY project. However, if you are installing windows in a basement that require cutting through 10 inches of poured concrete, that is a different story. Concrete cutting requires specialized saws, structural headers (lintels), and a deep understanding of your home’s load-bearing walls. If you’re unsure, it’s safer to call a pro to protect your home’s structural integrity.
How much does basement window installation cost?
A basic replacement window might cost $300–$600 for materials. However, a full egress installation—including excavation, concrete cutting, the window unit, and the well—typically ranges from $2,500 to $5,500. While the upfront cost is higher, the ROI is impressive. Adding a legal bedroom can increase home value by over $20,000. Check our egress window installation cost guide for a full breakdown.
Do I need a permit for a basement window?
If you are simply swapping an old window for a new one of the same size, you might not need one (though you should always check with your local building department in places like Evanston or Joliet). However, if you are enlarging an opening, cutting concrete, or installing an egress window for a bedroom, a permit is mandatory. This ensures the work is inspected for safety and meets fire codes.
Conclusion
Installing windows in a basement is a project that pays dividends in light, safety, and home value. While a dedicated DIYer can handle a standard replacement, the complexities of egress codes, concrete cutting, and structural support often make professional installation the smarter choice.
At Rooster Windows and Doors, LLC, we pride ourselves on providing high-quality, energy-efficient installations across the entire Chicagoland area—from Arlington Heights to Crystal Lake. We ensure your windows are not only beautiful but flawlessly sealed against the harsh Illinois winters.
Don’t leave your home’s safety and efficiency to chance. If you’re ready to transform your basement into a bright, legal living space, schedule your egress window installation with us today. We’ll handle the heavy lifting, the permits, and the precision work, leaving you with a basement you’ll actually want to spend time in.

