

Why a Proper New Construction Window Install Matters
Getting your new construction window install right is the difference between a dry, comfortable home and thousands of dollars in structural water damage.
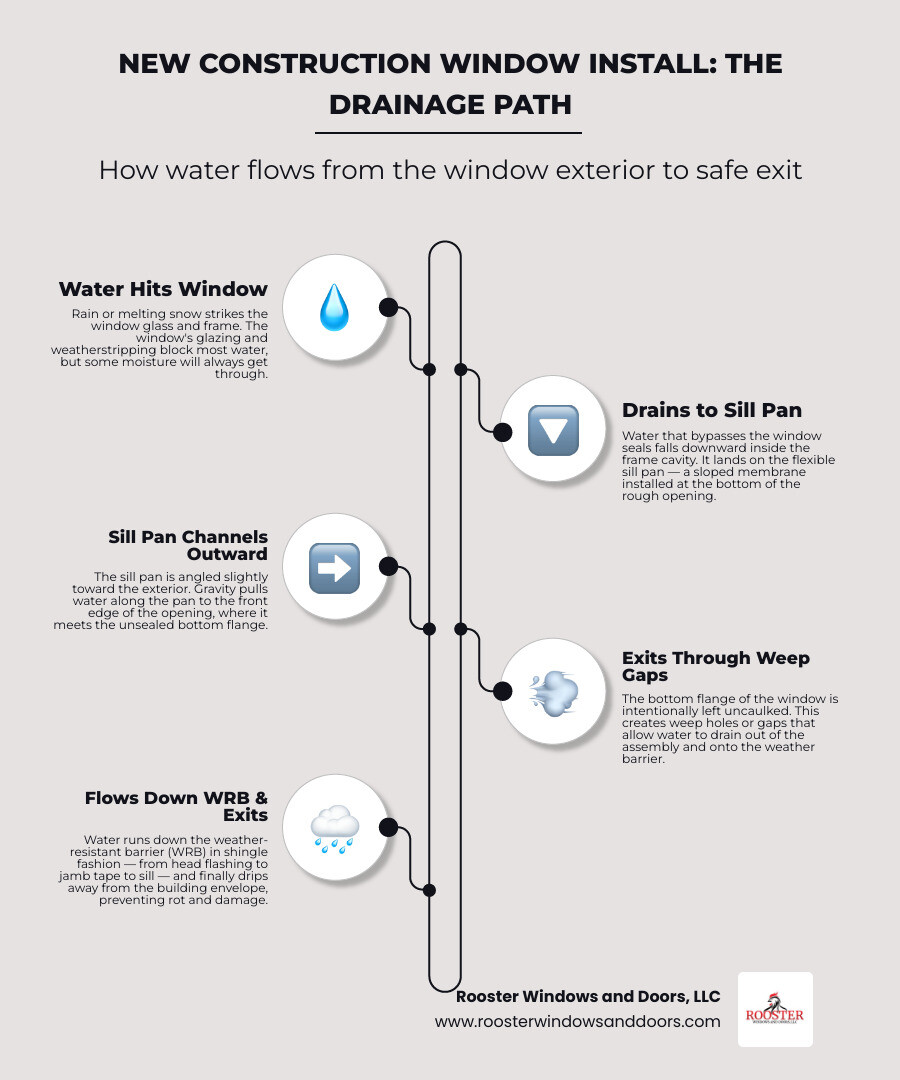
Most people think windows are meant to be completely waterproof. But here is the truth: all windows will eventually leak. The key to a successful installation is not trying to block water forever, but giving that water a safe, engineered path to drain back outside.
Quick Summary: How to Install a New Construction Window
To win the fight against moisture, follow this proven sequence:
- Prepare the opening: Clear the rough opening and cut back the weather-resistant barrier (WRB) to expose the sheathing.
- Install a sill pan: Use a flexible flashing membrane to line the bottom sill. This is your primary defense against rot.
- Apply sealant: Run a thick bead of sealant along the top and side flanges, but leave the bottom flange completely unsealed so water can escape.
- Set and level: Place the window, use composite shims to make it perfectly level and plumb, and secure it with fasteners.
- Flash the exterior: Apply flashing tape in “shingle fashion”—starting at the bottom, moving to the sides, and finishing at the head.
- Insulate the inside: Fill the interior gap with low-expansion foam to block drafts without bowing the frame.
I am Piotr Wilk, and for over two decades I have specialized in residential window and door installations across the Chicagoland area. Through my work at Rooster Windows and Doors, LLC, I have perfected the new construction window install process to ensure your home stays protected for decades to come.
Best Practices for a Watertight New Construction Window Install
When it comes to framing a home, the window opening is one of the most vulnerable points in the entire building envelope. Water is a persistent enemy. In the Chicagoland area—where we face everything from driving spring rains to heavy winter blizzards in places like Libertyville, Lake Forest, and Highland Park—proper moisture management is non-negotiable.
The single most critical component of a watertight installation is the sill pan.
An estimated 90% or more of all windows installed in American homes have no sill pan under them. This is a massive mistake. Installers often rely solely on the exterior nailing flanges and flashing tape to keep water out. Over time, as building materials expand and contract, those seals can fail. When water gets past the exterior flange, it pools directly on the wooden rough sill, leading to hidden wood rot, mold, and structural failure.
A sill pan is a three-sided, sloped barrier installed along the bottom of the rough opening before the window is set. If water bypasses the window’s outer seals, the sill pan catches it and channels it safely back out to the exterior weather plane.
To create a highly effective sill pan, we recommend using a premium flexible flashing tape, such as DuPont FlexWrap. While it costs a bit more than standard straight flashing tape, flexible flashing can be molded into a single, seamless piece that wraps down over the face of the weather-resistant barrier (WRB) and up the vertical sides of the rough opening. This eliminates the seams and joints where leaks typically start.
By taking the time to install a proper sill pan, you ensure that your window installation is built to handle the inevitable moisture that weather throws its way. For a deeper dive into professional window engineering standards, you can refer to the comprehensive Window Installation Guide.
Preparing the Rough Opening and Weather Barrier
Before you even lift the window unit, you must prepare the rough opening to act as a seamless extension of your home’s weather-resistant barrier (WRB). This step establishes the “weather plane” that separates your cozy interior from the harsh outdoor elements.
Proper preparation ensures that any moisture running down the housewrap is directed around and away from the window frame rather than behind it. For an in-depth look at how the entire window opening integrates into the building envelope, review the official manufacturer W I N D O W INSTALLATION GUIDE.
If you are replacing an old window down to the studs rather than building from scratch, you will follow a similar preparation process. This is known as a full frame installation, which provides the absolute best opportunity to inspect the underlying framing for water damage and install modern flashing systems.
Preparing the Rough Opening for a New Construction Window Install
To prepare the rough opening for a clean new construction window install, follow this precise sequence:
- Verify the Dimensions: Measure the rough opening’s width, height, and diagonals. The rough opening should typically be 1/2 inch to 1 inch larger than the overall window frame size. This gap provides the clearance needed for proper shimming, leveling, and thermal expansion.
- Execute the Box Cut on the WRB: Cut the housewrap across the center of the window opening horizontally, and make vertical cuts at the sides to create flaps. Fold the side and bottom flaps inward, wrapping them tightly around the framing studs, and staple them securely to the interior face of the framing.
- Create the Top Flap: At the head (top) of the rough opening, make two diagonal cuts extending upward and outward at 45-degree angles, roughly 6 inches long. Fold this top flap up and temporarily tape it out of the way. This exposes the bare sheathing directly above the window, which is crucial for integrating the head flashing later.
- Expose the Sheathing on the Sides: Cut back the WRB on the left and right sides of the opening to expose at least 1-1/2 inches of the bare wood sheathing. This creates a clean, solid surface for a direct contact seal with the window’s side flanges.
- Install Corner Guards: Apply pre-cut corner guard flashing tightly into the bottom corners of the sill. This reinforces the most leak-prone areas of the opening before you lay down the main sill flashing.
For homeowners in the Chicagoland area, keeping these steps precise is vital to surviving our freeze-thaw cycles. You can read more about regional weatherproofing techniques in our new window installation chicago guide.
Step-by-Step Installation and Flashing Sequence
Once the rough opening is prepped and the sill pan is in place, it is time to set, level, and flash the window unit.
To ensure the window operates smoothly without binding, you must use high-quality composite shims. Avoid cheap wood shims, as they can compress over time, absorb moisture, and rot. Composite shims maintain their structural integrity indefinitely, keeping your window perfectly plumb and square.
Step-by-Step Guide to a Flawless New Construction Window Install
Follow these steps to set and secure your window unit:
- Dry Fit the Window: Lift the window into the rough opening to verify the fit and ensure you have adequate clearance for shimming.
- Apply Sealant to the Flanges: Apply a continuous 3/8-inch bead of high-quality exterior sealant to the backside of the top and side nailing flanges. Crucial Rule: Do not apply sealant to the bottom flange. Leaving the bottom flange unsealed is vital to preserve the drainage path for any water that reaches the sill pan.
- Place the Sill Shims: Set composite shims along the rough sill. Place them roughly 4 inches from each corner and at every vertical mullion. Ensure they are level across the opening.
- Set the Window Unit: Carefully lift the window into the opening, resting the bottom frame on the sill shims. Press the side and top flanges firmly against the sheathing to squeeze the sealant bead.
- Temporarily Secure the Top Corner: Drive a single 1-1/2 inch galvanized roofing nail or #8 pan head screw through the nailing flange in one of the top corners. Do not drive it completely flush yet; you need some wiggle room for final adjustments.
- Level, Plumb, and Square the Unit:
- Place a level on the sill to check for horizontal alignment.
- Place the level against the jambs to check for vertical alignment (plumb).
- Take diagonal measurements from corner to corner. If the two diagonal measurements are identical, the window is perfectly square.
- Insert composite shims along the sides of the frame to lock the window in place once it is square.
- Secure the Nailing Flanges: Drive galvanized roofing nails or pan head screws through the flange holes. Start at the top, then move to the sides, and finish at the bottom. Pro Tip: Place a shim directly behind the bottom flange nail holes before fastening to prevent the flange from being pulled too tight to the wall, which would crush your drainage gap.
For more details on handling different window styles during this phase, check out our install replacement windows complete guide and our specific walkthrough on how to install replacement double hung windows. You can also cross-reference fastener spacing guidelines in the manufacturer’s technical document 20-4002-05.indd.
Applying Flashing Tape and Integrating the Weather-Resistant Barrier
With the window mechanically secured, you must apply exterior flashing tape to seal the flanges to the building’s weather barrier. Always apply flashing tape in a “shingle fashion” (bottom-to-top) so water naturally sheds over the seams.
- The Sill Flashing (Already Done): Your sill pan flashing should already wrap over the face of the WRB below the window.
- Apply Jamb Flashing (Sides): Cut two pieces of flashing tape that extend at least 6 inches above the top of the window frame and 6 inches below the bottom of the sill. Apply the tape over the side nailing flanges, sticking it directly to the exposed sheathing and overlapping the WRB.
- Apply Head Flashing (Top): Cut a piece of flashing tape that extends at least 6 inches beyond the outer edges of the side jamb flashing. Apply it over the top nailing flange, sticking it directly to the bare sheathing.
- Use a J-Roller: Firmly roll over all the flashing tape with a J-roller. This pressure-activates the adhesive, eliminates air pockets, and ensures a permanent, watertight bond.
- Drop and Seal the WRB Flap: Fold the temporary 45-degree WRB flap back down over the head flashing. Secure it with housewrap tape along the diagonal cuts, but leave the bottom edge of the flap unsealed directly above the window to let any trapped moisture escape.
Proper flashing integration is the absolute core of any professional window replacement or new installation project.
Material-Specific Considerations: Vinyl vs. Metal-Clad Wood
Not all windows are created equal. The physical properties of vinyl differ significantly from those of metal-clad wood, and your installation technique must adapt accordingly to prevent long-term operational issues.
| Installation Requirement | Vinyl Windows (e.g., YKK AP StyleView) | Metal-Clad Wood Windows (e.g., Loewen) |
|---|---|---|
| Thermal Expansion | High expansion/contraction rates. Requires flexible expansion joints. | Moderate expansion. Frame is highly stable; metal cladding expands independently. |
| Rough Opening Clearance | Typically 1/2″ larger than the frame to allow for expansion. | Typically 3/4″ to 1″ larger than the frame to accommodate heavy wood frames. |
| Fastener Sensitivity | High. Over-tightening can warp or bow the vinyl frame. | Low. Wood core provides robust structural resistance to over-tightening. |
| Brick/Stone Joints | Requires a strict 1/8″ expansion gap filled with backer rod and silicone. | Requires a standard perimeter sealant joint; highly stable. |
| Finishing Timelines | Can remain unfinished indefinitely; highly weather-resistant. | Interior wood must be sealed/painted within 14 days of installation to avoid warping. |
| Interior Cavity Insulation | Remnant fiberglass or strictly low-expansion foam only. | Low-expansion foam or fiberglass. Frame is less prone to bowing from foam. |
Vinyl Windows
Vinyl windows are highly popular for their low maintenance and excellent thermal performance. However, vinyl expands and contracts significantly with temperature swings. In places like Schaumburg, Arlington Heights, and Palatine, where temperatures swing from sub-zero winters to humid 90-degree summers, vinyl frames need room to move.
Never pin a vinyl window frame tight against brick or stone; always leave a 1/8-inch expansion gap. Additionally, never store vinyl windows in areas exceeding 140°F, and do not paint them, as this can warp the vinyl and void the manufacturer’s warranty.
Metal-Clad Wood Windows
Metal-clad wood windows offer beautiful interior wood aesthetics with a durable exterior metal shield. Because these units are heavy, they require solid 1-1/2 inch blocking at the sill and sides of the rough opening.
When installing large picture windows, you must follow highly precise glazing steps. This includes placing glazing shims at exact quarter points along the frame sill, applying specialized silicone (like U1600), and snapping in metal glazing stops without scratching the frame.
For detailed instructions on glazing metal-clad units, refer to the METAL CLAD PICTURE WINDOW GLASS & GLAZING INSTALLATION GUIDE. If you are adapting these units for older homes, you can learn more about our retro fit window options.
Frequently Asked Questions about Window Installation
Why should you never caulk the bottom flange of a window?
Leaving the bottom flange uncaulked is the golden rule of window installation. If you apply a continuous bead of caulk to all four sides of a window’s nailing flange, you create a closed, sealed box.
When water inevitably finds its way past the exterior seals—whether through a minor tear in the flashing tape, a failed corner joint, or extreme wind-driven rain—it will run down to the sill pan. If the bottom flange is caulked shut, that water has no escape path. It becomes trapped inside the wall cavity, where it will rot the framing, destroy your drywall, and foster toxic mold growth.
By leaving the bottom flange uncaulked and placing shims under every other nail hole, you preserve a continuous drainage path. Any incidental moisture that hits the sill pan can freely weep out to the exterior face of the wall, keeping your structure bone-dry. To learn more about these moisture dynamics, check out our window installation services complete guide.
What type of insulation should be used in the interior window cavity?
The gap between the window frame and the rough opening must be insulated to prevent drafts and maintain energy efficiency, but you must choose your materials carefully.
We highly recommend using a professional-grade, low-expansion polyurethane spray foam specifically formulated for windows and doors. Standard expanding spray foams expand with immense force and can easily bow vinyl or wood window jambs inward. A bowed jamb will prevent the window sashes from sliding or locking properly. When applying low-expansion foam, run a minimum 2-inch bead deep in the cavity, keeping the nozzle about 1 inch away from the exterior flange to leave room for expansion.
Alternatively, you can pack the cavity loosely with remnant fiberglass insulation. Never pack fiberglass tightly, as it relies on trapped air pockets to provide insulating value; over-compressing it destroys its R-value. For homeowners in Libertyville looking to maximize their home’s energy efficiency, you can read our localized advice on the expert window installation service in libertyville enhance your home page.
How much larger should the rough opening be than the window frame?
As a general rule, the rough opening should be 1/2 inch to 1 inch larger than the actual window frame width and height. This translates to a consistent 1/4-inch to 1/2-inch gap around the entire perimeter of the window unit.
This gap is essential for three reasons:
- Framing Tolerances: Rough openings framed by carpenters are rarely perfectly level, plumb, or square. The extra clearance allows you to adjust and square the window unit even if the wall framing is slightly skewed.
- Shimming Clearance: It provides the physical space needed to slide composite shims in place to support and level the frame.
- Thermal Expansion: Windows expand and contract with seasonal temperature changes. A tight rough opening would squeeze the window frame as it expands, causing the glass to crack or the frame to warp.
Ensuring these tolerances are correct is a hallmark of certified window installers.
Conclusion
A successful new construction window install requires patience, precision, and a deep understanding of water management. By prioritizing a seamless sill pan, following a shingle-fashion flashing sequence, and selecting the right materials for your specific window type, you can build a home envelope that stands up to the toughest Midwestern weather.
While a dedicated DIYer can tackle window installation with the right tools, minor mistakes can lead to hidden rot and costly repairs down the road.
At Rooster Windows and Doors, LLC, we provide flawless, high-quality, and highly energy-efficient installations across the entire Chicagoland area—including Libertyville, Lake Forest, Barrington, Evanston, Naperville, and Chicago. We offer a wide variety of premium vinyl and metal-clad wood windows tailored to your home’s unique style and performance needs.
Ready to secure your home’s comfort and energy efficiency? Contact us today to schedule a professional, worry-free window installation with our expert crew.

