

Key Differences: New Construction vs. Insert Window Replacement
When deciding between window installation styles, understanding how each system interacts with your home’s structural framing is essential. The fundamental difference lies in how deep the installation goes into the wall cavity.
An insert window (often called a pocket window or retro-fit window) slides directly into the existing wood or vinyl frame after the inner sashes and stops are removed. This approach leaves the original window frame, interior casing, exterior trim, and surrounding water-resistive barrier intact. While fast and minimally invasive, insert replacement relies entirely on the structural integrity and weather-tightness of your old frame.
In contrast, a new construction window replacement is a full-frame overhaul. We remove the glass, sashes, frame, interior casing, and exterior trim down to the original rough opening framing studs. This allows us to inspect the underlying wall sheathing for rot or insect damage, rebuild the opening if necessary, and apply brand-new flashing membranes directly to the building structure.
| Feature | New Construction Window | Insert Replacement Window |
|---|---|---|
| Primary Attachment | Integrated nailing fin fastened to exterior sheathing | Screws through jambs into existing window frame |
| Frame Removal | Entire frame, casing, and trim removed to studs | Original frame and trim remain intact |
| Siding Impact | Siding cut back or partially removed to expose sheathing | No siding removal required |
| Glass Surface Area | Preserves or expands original glass area | Reduces glass area slightly due to double-frame profile |
| Water Barrier Integration | Directly overlaps housewrap/weather barrier | Relies on exterior caulk and existing frame sealant |
| Ideal Application | Rot, structural decay, or changing window dimensions | Sound existing frame with solid wood/vinyl structure |
If your original frames are structurally sound, an insert window can be an efficient upgrade. However, when frame rot or deep water leaks are present, complete frame removal using window replacement techniques based on the Complete Window and Frame Replacement Guide is mandatory.
The Role of the Nailing Fin in Window Installation
The primary structural component that defines a new construction window is the nailing fin (or flange). This thin strip of rigid vinyl, composite, or aluminum extends outward from the perimeter of the outer frame.
During installation, the nailing fin rests flat against the exterior wall sheathing surrounding the rough opening. Galvanized roofing nails or stainless steel screws are driven directly through the pre-punched slots in the fin into the wall studs. This creates an exceptionally strong mechanical bond capable of resisting high wind pressures.
More importantly, the nailing fin forms the core of the window’s water management system. Self-adhered flashing tape (flashing membrane) is applied over the top and side flanges, overlapping the building’s housewrap in a shingle-lapped fashion. Water running down the face of the home naturally sheds over the flashing membrane and away from the window opening rather than seeping behind the frame.
Can a Replacement Window Be Installed Like a New Construction Window?
Homeowners often ask if a standard insert replacement window can be installed using full-frame techniques. The short answer is yes, but it requires specific mechanical adaptations.
Because standard insert windows lack an integrated nailing flange, they cannot be nailed directly to the face of the sheathing in the traditional sense. To perform a full-frame installation with a non-flanged window, we secure the unit by driving fasteners through the side jambs into the structural studs. We then apply specialized exterior brickmould or custom-formed aluminum trim coils around the exterior perimeter.
Alternatively, some manufacturers offer snap-on nailing fins or specialized vinyl brickmould caps that lock into external accessory grooves on the window frame. However, field-applied snap-on fins must be thoroughly sealed with high-performance silicone or polyurethane sealant along the snap channel to prevent water intrusion. If you are exploring full-frame upgrades without tearing off all exterior materials, reviewing options for a retro fit window can clarify which hybrid installation techniques best fit your home.
When to Choose a New Construction Window Replacement
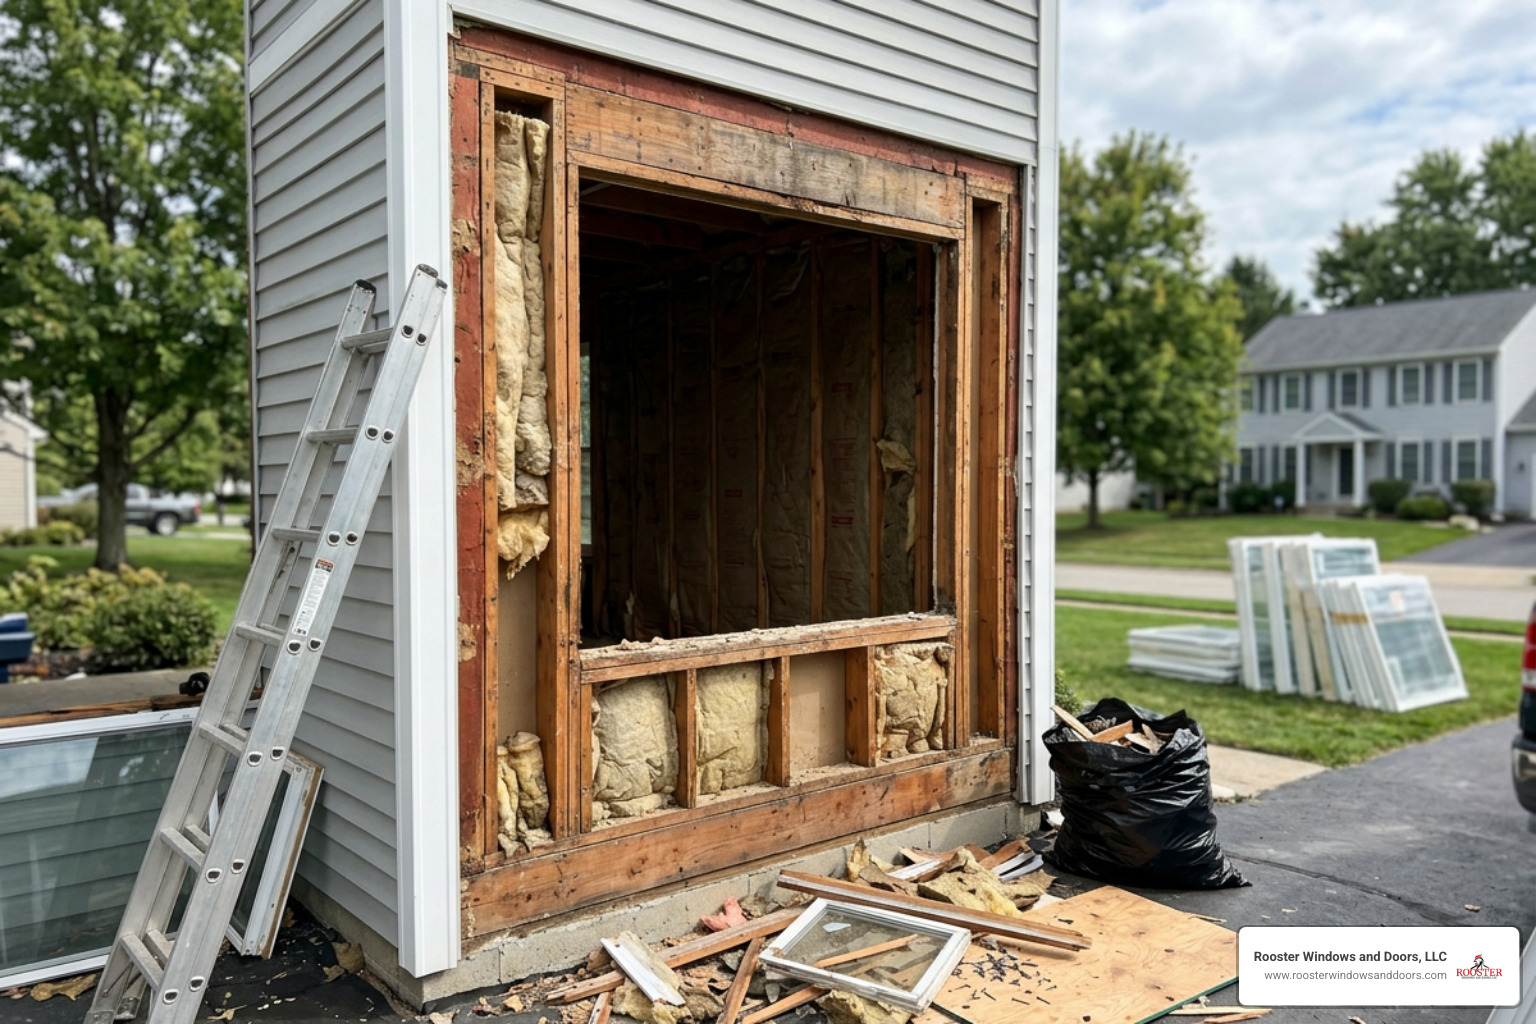
Choosing a full-frame replacement is a strategic decision that depends on the physical condition of your building envelope, your energy performance goals, and architectural preferences.
Key Triggers for New Construction Window Replacement
While insert replacements work well for simple glass upgrades, several clear conditions indicate that a full-frame new construction installation is necessary:
- Structural Decay and Rot: If soft spots, dark staining, or fungal decay are present on the window sill or frame jambs, inserting a new window over that rot simply buries the problem. The rot will continue to spread into the wall framing.
- Desire for Maximized Glass and Natural Light: Insert windows add frame-within-a-frame thickness, reducing the total visible glass area by 1 to 2 inches on all sides. Full-frame replacements preserve your original glass size or allow you to expand it.
- Severe Drafts and Energy Loss: In older homes, cold air often bypasses the window frame altogether, rushing through empty weight pockets (in historic double-hung setups) or uninsulated cavities between the frame and studs. Opening the wall down to the rough framing lets us completely seal and insulate these gaps. If you’re struggling with high energy bills, exploring comprehensive drafty window solutions alongside full-frame replacement offers the most dramatic performance increase.
- Architectural Style Changes or Historic Renovations: When converting a single window into a bay or bow style, or when installing modern clad-wood units to meet historical preservation standards, choosing a dedicated full frame installation ensures proper weight distribution and period-accurate interior casing.
Integrating Weather-Resistant Barriers and Siding
A critical phase of new construction window replacement is integrating the window’s flashing system with your home’s Weather-Resistant Barrier (WRB), commonly known as housewrap.
To reach the wall sheathing and properly layer the flashing, we carefully cut back or temporarily remove a 3- to 4-inch perimeter of exterior siding around the rough opening.
When integrating the window:
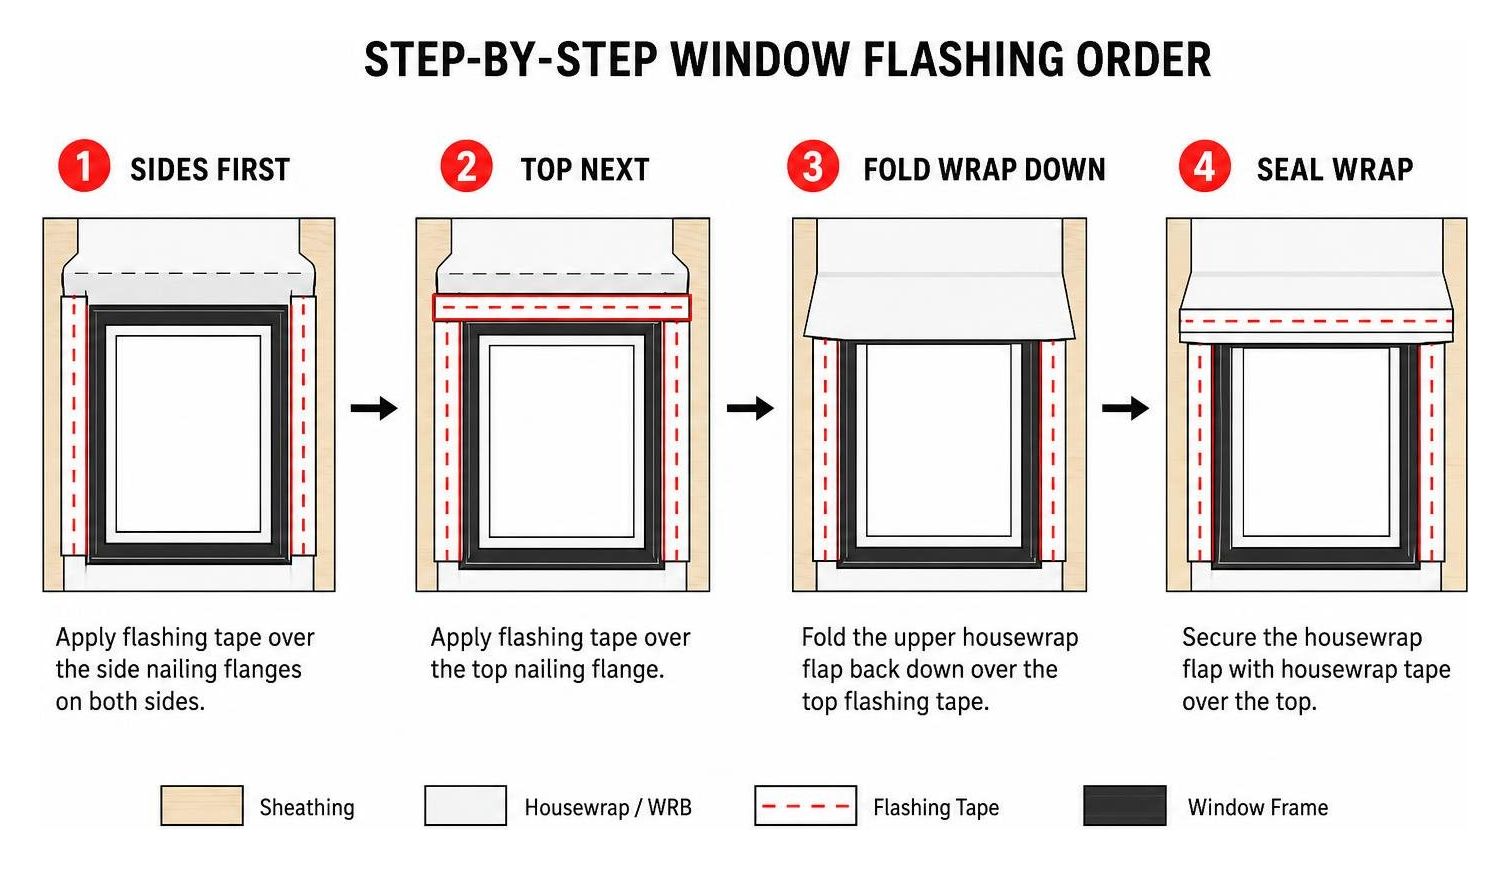
- The housewrap above the window head is cut diagonally and folded up to create a temporary flap.
- The window’s side and top nailing flanges are set against the exposed sheathing over a bed of continuous elastomeric caulk.
- Self-adhered flashing tape is applied over the side flanges first, followed by the top flange.
- The upper housewrap flap is folded back down over the top flashing tape and secured with housewrap tape.
This shingle-lap layering ensures that gravity moves liquid water down the exterior surface without allowing moisture to track inward toward the wall studs.
Technical Challenges and Flashing Best Practices
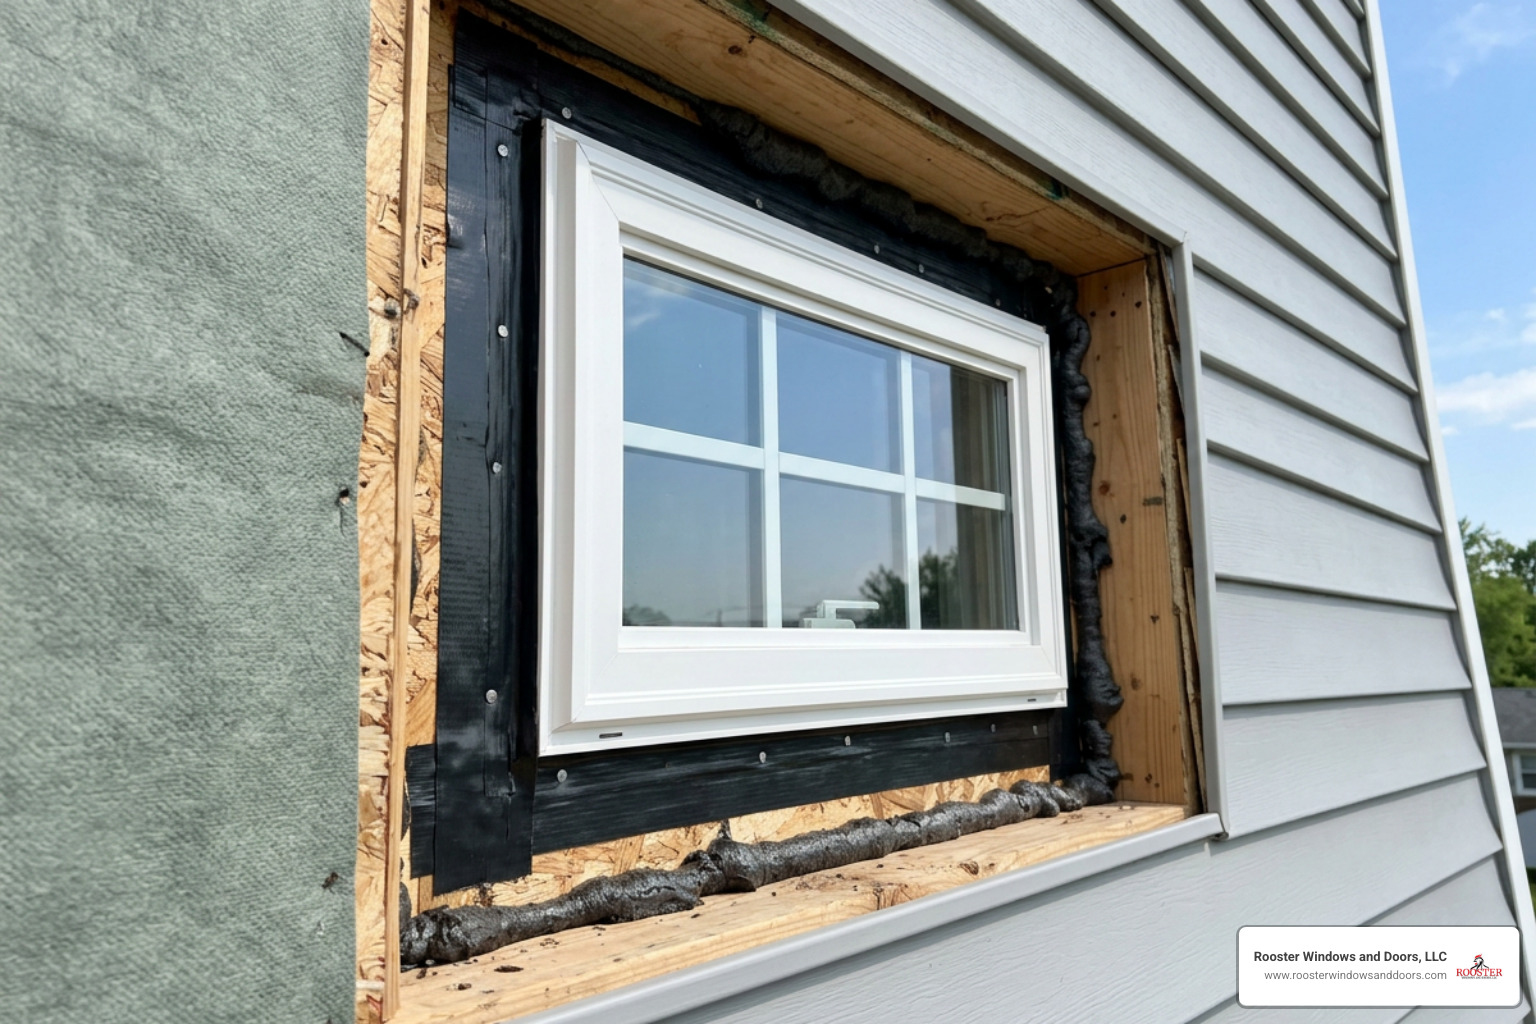
Proper weatherization demands strict adherence to professional standards, such as those outlined in ASTM E2112 (the standard practice for installation of exterior windows and doors) and manufacturer guides like the W I N D O W Installation Guidelines.
Flashing and Sealing Steps for New Construction Window Replacement
Water infiltration is the leading cause of structural wall failure. To protect your home, we use a multi-tiered flashing strategy:
- Prepare the Rough Opening Sill: We inspect the lower rough opening sill plate to ensure it is level and structurally sound. We apply a flexible sill pan or self-adhered membrane across the horizontal sill plate, extending it at least 6 inches up each jamb side and folding it over the exterior wall face.
- Apply Sealant Bed: A continuous 3/8-inch bead of high-grade sealant is applied around the interior back face of the top and side nailing fins. Critical step: The bottom flange sealant must include 2-inch drainage voids located roughly 2 inches inward from each corner. These voids allow any incidental water that enters the assembly to drain safely to the exterior instead of pooling inside the frame.
- Set, Level, and Fasten: The unit is placed into the opening, supported on composite shims set 4 inches from each corner. We check for level, square, and plumb, and measure diagonal dimensions to prevent frame racking. Galvanized fasteners are driven through the flange holes into solid wood framing.
- Air-Seal the Interior Gap: From the inside, we fill the gap between the window frame and wall studs using closed-cell, low-expansion polyurethane foam. Standard high-expansion foam must never be used, as its expansion force can bow the window jambs, locking the operating sashes in place. For deep weatherization tips, consult our guide on window door weatherproofing.
Best Practices for Installing Windows Without a Nailing Fin
When full-frame replacement is required on masonry, stone veneer, or brick-clad structures where nailing fins cannot be nailed to exterior sheathing, alternative fastening methods are necessary:
- Direct Frame Fastening: We drill pre-counterbored installation holes through the window jambs, securing the frame into wood bucking or masonry wall anchors using stainless steel screws.
- Double Sealant Beads: Dual lines of elastomeric polyurethane caulk are run continuously around the exterior frame joint where the unit meets the brick or stone stop.
- Interior Casing Realignment: Because new box-frame units may sit at a slightly different depth within the rough opening, custom wood jamb extensions and interior trim casings are crafted on-site to blend the new frame with the interior wall surface.
Tools, Materials, and Installation Costs

Executing a flawless new construction style replacement requires specialized building products and commercial-grade tooling.
Essential Tools and Hardware Checklist
- Fast-acting self-adhered butyl or acrylic flashing tapes (minimum 4-inch to 9-inch widths)
- Non-compressible composite shims (which resist moisture rot better than wood)
- Professional-grade low-expansion window and door insulating foam
- Non-sag elastomeric or polyurethane exterior joint sealants
- Oscillating multi-tools, reciprocating saws, and pneumatic finish nailers
- J-rollers to press self-adhered membranes flush against sheathing
Cost Factors and Energy Savings
Investing in a full-frame new construction style replacement involves higher initial costs than simple insert installations due to the additional labor, trim work, and siding integration required.
Across our service area, homeowners typically invest between $750 and $1,800 per window for a standard insert installation, while full-frame new construction installations generally range from $1,200 to $2,600+ per opening depending on frame material (vinyl, clad wood, composite, or fiberglass), exterior siding cutback complexity, and interior trim detail. To learn more about project variables, read our breakdown on the real cost of new windows.

Despite the higher upfront cost, full-frame replacements offer outstanding long-term thermal return on investment. According to ENERGY STAR performance metrics:
- Replacing old single-pane glass with modern high-efficiency windows saves homeowners between 7% and 15% annually on total heating and cooling utility costs.
- High-efficiency ENERGY STAR-rated models perform at least 15% better than standard code windows, achieving insulating performance of R-3 or higher.
- Ultra-efficient triple-pane units can perform 50% better than standard options, delivering R-5 or higher thermal resistance.
Choosing certified energy star windows during a full-frame replacement ensures that both the window unit and the thermal barrier surrounding the frame deliver maximum comfort.
Frequently Asked Questions About Window Replacement
What are the risks of improper window installation?
Improperly installed windows are a leading cause of concealed structural damage. If flashing tape is lapped incorrectly (e.g., placing upper housewrap behind lower flashing tape), water running down the wall is directed straight into the house framing. Over time, this leads to rot in the wood studs, structural rim joist decay, toxic mold growth, and failed wall insulation.
Improper perimeter sealing also causes cold drafts, thermal bridging, and frame racking, which can cause glass sashes to stick or bind during operation.
How long does a full-frame window replacement project take?
While an insert installation project can often be completed rapidly, full-frame new construction window replacements take more time due to frame removal, siding integration, exterior flashing, and interior trim carpentry.
For a standard single-family home requiring 10 to 15 full-frame window replacements, a certified 4 to 5-person professional installation crew can complete the job in 1 to 2 full days.
Is siding removal always required for new construction window installation?
Siding removal is not always required, but a clean siding cutback perimeter is necessary. If you have vinyl siding, section pieces around the window are carefully unzipped, modified, and reinstalled with new J-channel strips.
For fiber cement, engineered wood, or cedar siding, installers use a plunge saw to cut back the siding roughly 3 to 4 inches from the window edge. This creates the necessary clearance to apply flashing membranes directly to the sheathing. Once flashing is complete, high-grade exterior trim boards (such as PVC or composite brickmould) are installed to fill the gap and capped with flexible caulking.
Conclusion
Choosing between insert replacement and new construction window replacement ultimately comes down to the condition of your existing frames and your goals for your home’s exterior envelope. While insert windows offer a quick cosmetic upgrade, a complete full-frame replacement provides unmatched air sealing, superior water protection, and long-term structural integrity.
At Rooster Windows and Doors, LLC, we bring decades of practical craftsmanship and building-science expertise to every project across Libertyville, Lake Forest, Highland Park, Vernon Hills, Mundelein, Lake Zurich, Buffalo Grove, Deerfield, Gurnee, Arlington Heights, Palatine, Schaumburg, Evanston, Glenview, Chicago, and surrounding communities. Whether your project calls for precise pocket inserts or full-frame replacement down to the studs, our certified installation teams ensure your project is completed flawlessly.
Ready to upgrade your home’s comfort and energy efficiency? Contact our expert team today to explore our comprehensive window installation services and find the perfect replacement solution for your home.

