

How to Install a Door Jamb Extension in 5 Simple Steps
Understanding When and Why You Need a Door Jamb Extension
To install a door jamb extension, measure the depth gap between the frame and finished wall, rip extension strips to width, fasten the pieces to the jamb edges with brad nails and adhesive, insulate and seal the perimeter, and nail casing trim in place. This straightforward process bridges the opening whenever wall thickness exceeds standard frame depths.
When building or renovating homes, framing dimensions often change while off-the-shelf door frames remain static. Most standard interior and exterior doors are pre-hung on jambs designed specifically for nominal 2×4 stud framing finished on both sides with 1/2-inch drywall. That yields an industry-standard jamb depth of 4-9/16 inches.
However, modern building standards, energy-efficiency codes, and architectural renovations frequently call for 2×6 framing to accommodate thicker insulation batts. In other cases, basements require furring strips over concrete, older plaster walls add extra thickness, or exterior sheathing upgrades push the overall wall depth past 6-1/2 inches. When your rough opening is deeper than the frame, standard trim cannot bridge the divide.
Understanding extension jamb depth requirements ensures that your casing lays completely flat against the surrounding wall surface instead of floating at an awkward angle. If you are already replacing interior door frame components or setting up new entryways, checking wall depth early prevents structural alignment issues and drafts.
| Wall Framing Type | Wall Build-Up Details | Typical Total Wall Depth | Required Jamb Depth / Extension Need |
|---|---|---|---|
| Standard 2×4 Interior | 3-1/2″ stud + two 1/2″ drywall layers | 4-1/2″ to 4-9/16″ | Standard 4-9/16″ jamb (No extension needed) |
| Standard 2×4 with Plaster | 3-1/2″ stud + lath & plaster (approx. 3/4″ each side) | 5″ to 5-1/4″ | Requires 1/2″ to 3/4″ custom jamb extension |
| Standard 2×6 Exterior | 5-1/2″ stud + 1/2″ drywall + 1/2″ exterior sheathing | 6-1/2″ to 6-9/16″ | Standard 6-9/16″ jamb or 2″ jamb extender kit |
| 2×6 with Continuous Foam | 5-1/2″ stud + drywall + sheathing + 1″ rigid foam | 7-1/2″ to 7-9/16″ | Requires 3″ extension or custom-ripped stock |
| Masonry / Furring Retrofit | Concrete/brick + 1-1/2″ furring + 1/2″ drywall | Varies (5″ to 8″+) | Custom-measured jamb extensions required |
Choosing the Right Door Jamb Extension Materials and Kits
Selecting the correct material for your jamb extension depends largely on whether the door is located inside or exposed to outdoor elements, as well as whether you plan to paint or stain the finished trim.
- Primed Pine & Poplar: Excellent for interior paint-grade projects. Poplar offers clean edges and resists denting, while finger-jointed primed pine provides an economical, ready-to-paint surface.
- Solid Hardwoods (Oak, Maple, Cherry): Essential for stain-grade openings. You must match the wood grain and species of your pre-hung jamb to achieve a seamless architectural appearance.
- PVC & Poly-Composites: The ultimate solution for high-moisture interior zones (like basement bathrooms) and exterior entries. PVC will never rot, warp, or absorb ambient humidity, which helps with how to keep a door from warping over decades of severe seasonal swings.
- Factory-Milled Kits with Extender Sills: For exterior units, buying a pre-milled kit ensures you get matching side legs, head jambs, and an aluminum sill extension. High-quality kits often feature a bronze sill or zinc sill component that locks directly into your existing threshold tongue to keep driving rain out.
Essential Tools and Materials for Jamb Extension Projects
Before starting, assemble the correct tools and fasteners. Working with precision millwork requires reliable cutting and measuring equipment.
- Measuring & Layout: Tape measure, precision combination square, pencil, digital angle finder.
- Cutting Tools: Table saw with a fine-finish blade (for ripping extension strips to width), miter saw (for crosscutting exact heights and mitering trim), and a fine-tooth handsaw or hacksaw (for aluminum sill extenders).
- Fasteners & Attachment: 18-gauge brad nailer with 1-1/2″ to 2″ brad nails, 10D finish nails, and 3-inch exterior trim screws (for structural anchoring into framing).
- Adhesives & Sealants: High-tack wood glue, paintable polyurethane or acrylic latex sealant, low-expansion expanding foam (specifically formulated for doors and windows).
- Finishing Supplies: Wooden shims, wood putty or high-performance spackle, 120- and 220-grit sandpaper, quality primer, and matching finish paint.
- Documentation: Review your manufacturer’s specific guidelines, such as the manufacturer jamb extension guide, to verify screw spacing and clip placement for your exact door brand.
Step-by-Step: How to Install a Door Jamb Extension
Whether you are finishing an interior passageway or referencing an exterior door installation guide to seal out weather, installing a jamb extension follows a systematic process.
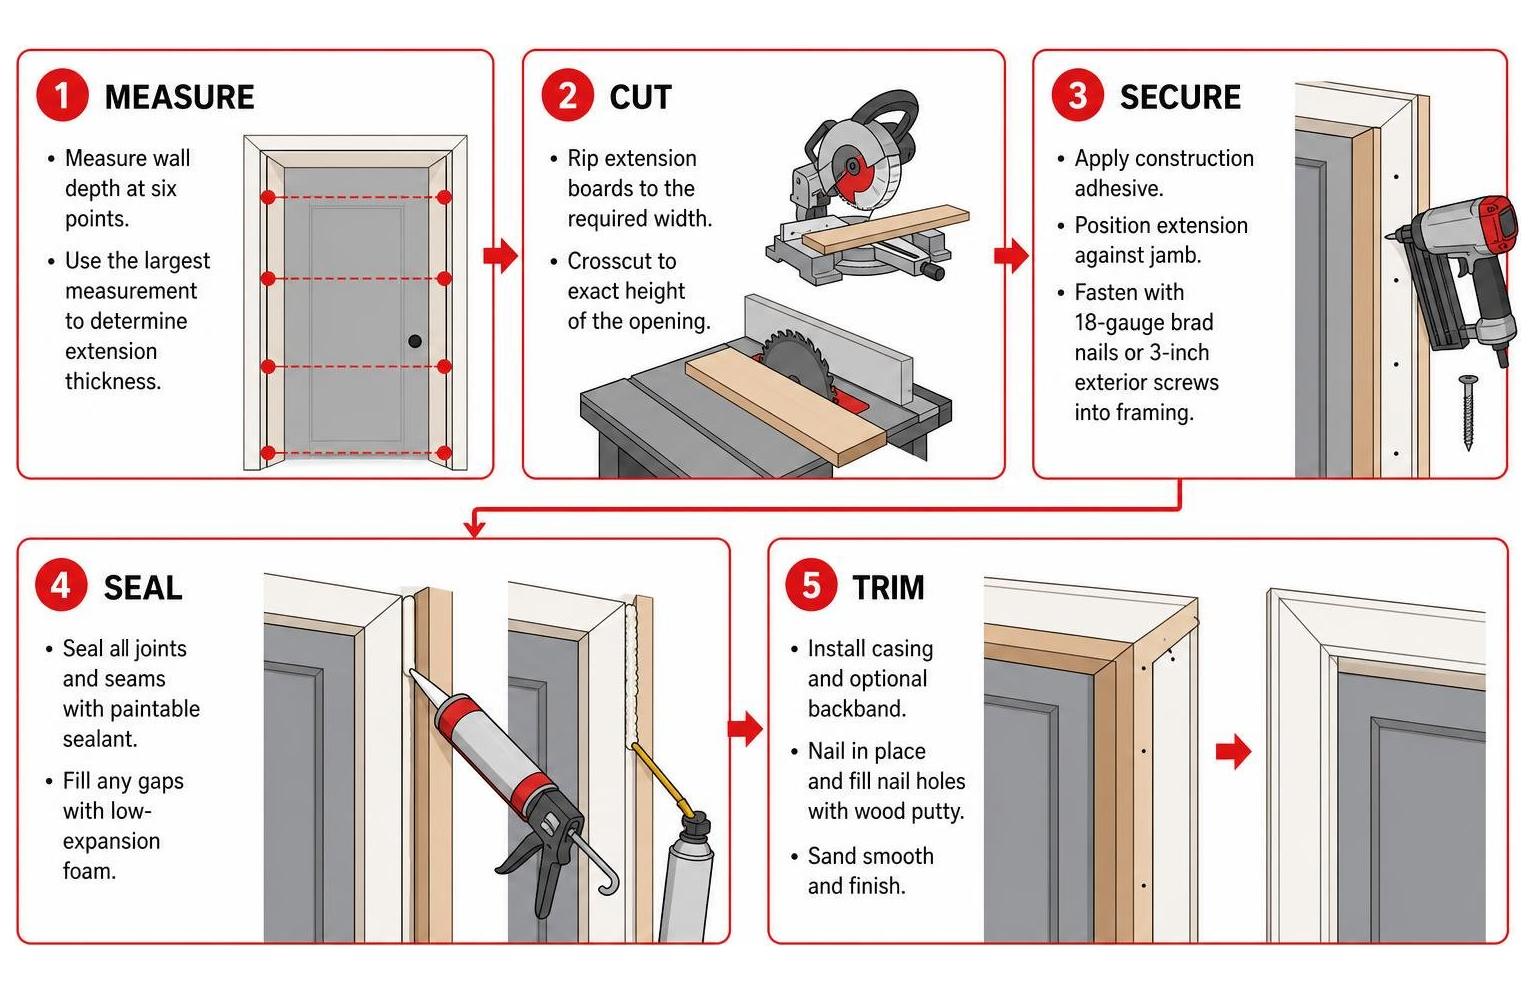
Step 1: Measure Wall Depth and Determine Reveals
Start by evaluating the gap between your existing door frame edge and the plane of the finished drywall or plaster.
- Check Multiple Points: Walls are rarely perfectly straight. Take depth measurements at six separate points: top, middle, and bottom on both the left and right sides.
- Account for Wall Variations: When replacing interior doors in old house settings, plaster thickness can fluctuate significantly along a single opening. Identify the widest point so your extensions sit flush with the most prominent section of the wall.
- Choose Your Joint Style:
- Flush Extension: The extension strip aligns perfectly flush with the existing door jamb edge. This requires precise sanding and filling so the seam disappears under paint.
- Stepped Reveal (Recommended): Set the extension back 1/8 to 1/4 inch from the inside edge of the primary jamb. This intentional reveal creates an attractive architectural shadow line and eliminates the frustration of trying to make two separate boards look perfectly seamless.
Step 2: Cut the Door Jamb Extension Pieces to Fit
With your dimensions verified, cut your extension stock to match the opening dimensions.

- Cut the Threshold Extender (Exterior Doors Only): If installing an exterior kit, measure the door sill width. Cut the aluminum sill extender using a hacksaw or non-ferrous metal blade. Test-fit the sill extender to ensure it snaps cleanly onto the existing threshold channel.
- Rip Side and Head Extenders to Width: Using a table saw, rip your extension lumber to the precise width determined in Step 1.
- Crosscut to Length:
- Cut the top head extender to match the exact span between the rough framing or the primary head jamb width.
- Cut the two side jamb extenders to run from the threshold/floor up to the bottom edge of the top head piece (or miter them at a 45-degree angle if your kit utilizes full-mitered jamb corners).
- Dry Fit All Components: Hold the wood and sill pieces in place with painter’s tape or light clamps to check that every edge aligns with the finished drywall plane.
Step 3: Fasten and Secure Extenders to the Frame
Once dry fitting confirms an accurate fit, begin fastening the assembly permanently.
- Apply Sealant Bead: For exterior installations, apply a continuous 1/4-inch bead of exterior-grade polyurethane sealant along the mating seam of the original frame and sill before setting extenders in place.
- Attach Side Extenders: Secure the side pieces to the existing jamb using an 18-gauge brad nailer loaded with 1-1/2-inch brads spaced every 8 to 12 inches.
- Anchor the Head Extender: Position the top head extender, verify your reveal lines with a combination square, and nail it firmly into place.
- Structural Fastening: On exterior units, pre-drill pilot holes 1 inch from the outer edges and drive 3-inch trim screws through the extension jamb and shims directly into the wall framing studs to ensure the door withstands high winds and heavy slamming.
Step 4: Seal, Insulate, and Fill Fastener Holes
Proper sealing ensures thermal efficiency, stops insect penetration, and creates a professional canvas for painting.
- Insulate the Perimeter Void: Fill the shim gap between the extended jamb and rough wall framing with low-expansion foam. Do not overfill, as overly aggressive foam can bow jamb legs inward.
- Caulk Exterior and Wet Seams: Apply paintable exterior-grade caulk to all outdoor joint connections. In damp interior environments, sealing prevents water from penetrating unseen cavities—an essential step in long-term door frame repair prevention.
- Fill Fastener Holes: Fill all counter-sunk nail and screw indentations with premium wood putty. Allow it to cure completely, then sand flush using 220-grit sandpaper.
Step 5: Install Casing and Apply Matching Finish
The final phase ties the jamb assembly directly into your room’s architectural molding.
- Establish Casing Reveals: Use your combination square to mark a uniform 1/4-inch reveal back from the inside edge of the newly installed jamb extension.
- Install Trim: Measure, miter, and nail your casing molding following our door trim installation complete guide. For tight, professional miter corners that never separate, see how to install door casing only one simple way to guarantee results.
- Prime and Paint: Apply an interior or exterior-grade primer to any raw cut edges. Apply two coats of premium trim enamel to match the door slab and adjacent baseboards.
Common Mistakes to Avoid During Installation
Even experienced DIYers can encounter difficulties when dealing with out-of-plumb walls and complex millwork. Here are the most frequent pitfalls to avoid:
- Failing to Seal All Six Sides: Wood expands and contracts based on ambient humidity. Unsealed wood surfaces—especially the bottom cut ends and back faces—absorb moisture, leading to warping, rotting, or seam separation.
- Forcing a Flush Joint on Wavy Drywall: Attempting to make extension jambs sit dead-flush with uneven, wavy drywall will cause casing miters to open up. Instead, use a deliberate 1/8″ to 1/4″ stepped reveal to create a clean shadow line that conceals minor framing irregularities.
- Omitting Solid Shims Behind Fasteners: Nailing or screwing an extension jamb into a void without placing solid wooden shims behind it will bow the jamb inward, binding the door slab or ruining casing alignment.
- Using Standard Expanding Foam: Always use low-pressure, low-expansion window and door foam. Standard high-expansion gap fillers exert enough lateral pressure as they cure to bend 3/4-inch wood jambs.
- Overlooking the Sill Extender on Exterior Doors: Never extend the wood jambs of an entry door without extending the sill beneath them. An unsupported jamb hanging over an exterior void invites rot, insect infestation, and water infiltration.
Frequently Asked Questions About Door Jamb Extensions
Can you install a jamb extension on an already hung door?
Yes. You do not need to remove the entire pre-hung door unit to extend the jambs. Simply pry off the existing interior or exterior casing trim carefully using a pry bar and trim puller. Once the rough framing gap is exposed, measure the remaining depth, rip your extension strips to size, apply adhesive, and nail the extenders directly to the exposed frame edges using a stepped reveal technique. Once secure, re-insulate the perimeter and install new casing.
What is the difference between a jamb extension and a jamb extender kit?
A standard jamb extension refers to individual, custom-ripped strips of lumber (such as pine, poplar, or PVC) cut by a carpenter on-site to bridge a wall depth gap. A jamb extender kit is a packaged, factory-machined product manufactured by door companies. These kits include pre-sized side jamb extenders, a matching head extender, dedicated fastening hardware, and an engineered metal sill extender that snaps or screws directly into pre-existing threshold grooves.
When should you hire a professional for door frame extensions?
While adding a simple 1/2-inch pine strip to an interior bedroom door is well within reach for most DIY homeowners, exterior doors with composite thresholds, continuous exterior foam, severe out-of-square framing, or structural framing rot warrant professional assistance. Exterior entries serve as your primary barrier against air leakage and driving rain, making professional weatherproofing, flashing, and threshold integration vital to protecting your home’s structural framing.
Conclusion
A well-crafted door jamb extension bridges the gap between modern framing dimensions and standard door assemblies. By taking accurate measurements, selecting durable materials, creating clean reveal lines, and sealing every joint against air and moisture infiltration, you can achieve a seamless, high-end finish that protects your home for decades.
If your renovation project involves complex exterior entries, multi-panel patio doors, or non-standard wall assemblies that require tailored millwork, our team at Rooster Windows and Doors, LLC is here to help. We deliver precision craftsmanship and energy-efficient solutions across the northern and northwest Chicago suburbs, ensuring every door operates smoothly and seals tightly against the elements. Contact us today to explore our comprehensive door installation services and schedule your on-site consultation.
