

Do You Put Quarter Round on Door Frame or Stop at the Casing?
When tackling new flooring projects in homes throughout Chicagoland—from Arlington Heights to Lake Forest—the intersection between baseboards, floating floors, and doorways always sparks questions. The golden rule of finish carpentry is simple: stop your quarter round at the casing.
Quarter round is designed as a horizontal transition piece. Its sole purpose is to bridge the gap between flat baseboards and flooring materials. A door frame serves an entirely different visual and structural purpose. Wrapping floor trim up or across door trim clutters the doorway profile.
If you are currently evaluating your trim layout, reviewing our Door Trim Installation Complete Guide will give you a solid foundation on how various molding profiles interact. Running quarter round into the door casing instead of wrapping around it preserves the clean vertical lines of your entryway. In Family Handyman’s guide to installing quarter round, veteran carpenters agree that proper termination creates the seamless look that homeowners expect.
Why Traditional Trim Rules Say Not to Wrap Door Casings
Door casings provide a visual frame around an opening. When you attach quarter round to the face or interior edges of a door frame, several practical and visual problems occur:
- Visual Clutter: Casings are milled with deliberate profiles, fluting, or smooth bevels. Adding a bulky curved piece at the bottom disrupts the architectural symmetry of the room.
- Door Clearance Issues: Adding molding inside the door jamb can prevent the door slab from swinging freely, creating sticking points.
- Dirt Traps: Horizontal ledges inside a high-traffic doorway gather dust, shoe scuffs, and debris quickly.
- Improper Floor Expansion: Floating floors like luxury vinyl plank (LVP) and laminate require a 1/4-inch to 1/2-inch perimeter expansion gap. Wrapping quarter round inside the jamb often pins the floor in place if fasteners accidentally hit the flooring planks.
In a DIY community poll, 44% of woodworkers explicitly emphasized ending quarter round at the outer casing edge using a bevel or return cut rather than carrying it across the frame.
Shoe Molding vs Quarter Round: Profile Differences Around Doors
Homeowners frequently ask if shoe molding is a better alternative around doorways. While both conceal flooring gaps, their proportions differ significantly:
- Quarter Round: Features a symmetrical profile that forms a true 90-degree arc (typically 3/4-inch wide by 3/4-inch tall). It provides maximum coverage for large expansion gaps.
- Shoe Molding: Has a slimmer, taller profile (typically 1/2-inch wide by 3/4-inch tall). It sits tighter against vertical surfaces and flexes more easily over slight floor dips.
| Feature | Quarter Round | Shoe Molding |
|---|---|---|
| Standard Dimensions | 3/4″ x 3/4″ | 1/2″ x 3/4″ |
| Cross-Section Shape | True 90° quarter circle | Slender, elongated vertical curve |
| Best Used For | Wide expansion gaps (up to 1/2″) | Narrow gaps and low-profile aesthetics |
| Doorway Clearance | Protrudes further into walking space | Sits flatter against baseboards |
| Material Flexibility | Stiffer; requires precise scribing | More flexible along uneven floors |
Because shoe molding has a narrower 1/2-inch footprint, it offers a subtler appearance where baseboards meet door casings, minimizing the chance of the molding overhanging the casing edge.
Budget-Friendly Alternatives: When You Don’t Need Quarter Round
Before spending money on extra trim, consider low-cost installation techniques that eliminate the need for quarter round at doorways altogether.
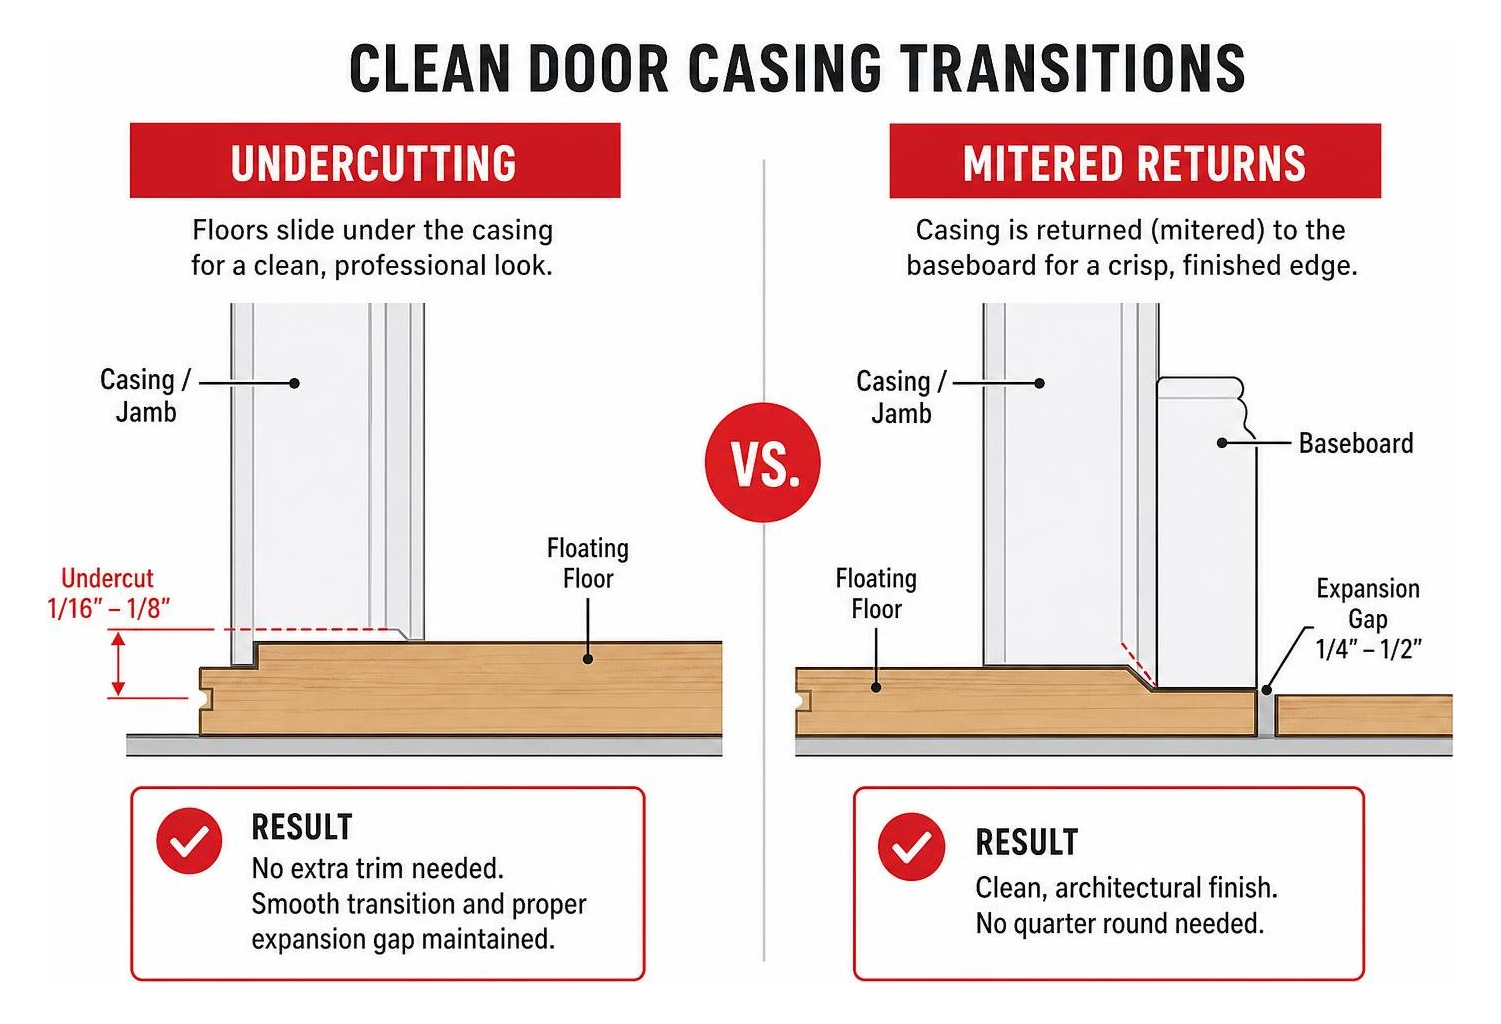
If you are updating older woodwork or replacing interior door frame components, plan your floor transitions early to save time and materials.
Undercutting Door Jambs for Floating Floors
The most cost-effective and professional method for handling door frame gaps is undercutting. By cutting the bottom 1/16-inch to 1/8-inch off the bottom of the jamb and casing, your new flooring slides underneath the frame.
Here is the straightforward method:
- Lay a scrap piece of your new flooring (including underlayment) flat against the door jamb.
- Rest an oscillating multi-tool or manual flush-cut jamb saw flat on top of the scrap plank.
- Cut horizontally through the door jamb and casing.
- Clear the cut wood block out with a chisel.
- Slide the flooring plank directly beneath the frame, leaving your 1/4-inch expansion gap hidden out of sight beneath the wall plate.
This approach gives you a custom, built-in appearance without spending money on extra molding. If you are fitting new casing from scratch, consult our guide on how to install door casing to align your reveals accurately before laying floors.
Using Plinth Blocks for Flush Transitions
In historic or traditional homes—such as those found across Evanston, Highland Park, and Chicago—baseboards are often thicker than standard door casings. When quarter round is added, it can stick out past the face of the casing.
A classic solution is a plinth block:
- A plinth block sits on the floor at the base of the door casing.
- It is thicker and wider than both the casing and the baseboard.
- The door casing rests on top of the block, while the baseboard and quarter round butt cleanly against its side.
This eliminates awkward miter cuts and creates an elegant transition point.
How to Finish and Cut Quarter Round at a Door Casing
When baseboards meet a door casing, leaving a blunt 90-degree cut exposes raw end grain or MDF core material. Professional carpenters use a mitered return to wrap the profile back into the wall.
According to the Tools Radar quarter round installation guide, precision cuts and careful end-capping are the primary markers of professional-grade trim carpentry. If your door framing has settled or sustained previous damage during renovations, address any necessary door frame repair before installing new trim.
Cutting 45-Degree Mitered Return Caps
A 45-degree mitered return creates a small cap that turns the rounded profile of the molding back toward the wall:
- Measure the Run: Measure from your wall corner to the point where the baseboard meets the outer edge of the door casing.
- Make the Primary Cut: Cut the quarter round to length using an outside 45-degree miter cut, angling back toward the wall.
- Cut the Return Piece: Take a scrap piece of matching quarter round. Set your miter saw to the opposite 45-degree angle and make a cut. Then, make a 90-degree straight cross-cut right at the heel of that angle. This creates a tiny triangular wedge.
- Assemble the Joint: Place a drop of fast-setting wood glue or cyanoacrylate (CA glue) on the mitered faces and secure the small return piece into the end of your main molding run.
This creates a continuous, self-contained end that rests flush against the door casing.
Fastening to Baseboards and Managing Gaps

Correct fastening protects your flooring warranty and prevents board buckling over seasonal changes:
- Use the Right Fasteners: Fasten your trim using an 18-gauge brad nailer with 1-1/4-inch to 1-1/2-inch brad nails.
- Nail Direction: Drive nails horizontally or at a slight downward angle directly into the baseboard, spaced every 12 to 18 inches.
- Never Nail to the Floor: Nailing through the floor locks floating materials in place, leading to buckled seams when temperatures shift.
- Caulk and Fill: Fill all nail holes with color-matched wood filler. Apply a thin bead of paintable acrylic latex caulk along the top seam where the quarter round meets the baseboard. Do not caulk the bottom edge where trim meets floating flooring.
Frequently Asked Questions About Installing Trim Around Doors
Do you put quarter round on door frame if there is an expansion gap?
No. Instead of putting quarter round on the frame itself, terminate the molding at the outside edge of the casing with a 45-degree miter return. If an unsightly gap was left directly under the jamb because undercutting was skipped, use a color-matched flexible sealant or slip a thin wood sliver underneath rather than wrapping the frame in trim.
Why do you put quarter round on door frame transitions instead of shoe mold?
Quarter round is typically chosen over shoe molding when the expansion gap between the new flooring and the baseboard exceeds 1/2 inch. Because standard quarter round measures a full 3/4 inch in width, it bridges wider gaps that shoe mold cannot hide.
Should quarter round be nailed to the floor or the baseboard?
Quarter round should always be nailed to the baseboard or wall framing, never to the floor. Fastening trim to floating planks restricts natural expansion and contraction, which can cause floors to separate or peak over time.
Conclusion
Deciding how to handle trim around your doors does not require expensive upgrades or complicated workarounds. By undercutting door jambs during flooring installations or terminating baseboard quarter round with crisp mitered returns at the casing, you maintain clean architectural lines while protecting your floor’s natural movement.
When upgrading your home’s entryways, patio systems, or interior passageways across the North Shore and Northwest Suburbs, partnering with experienced professionals ensures durable, beautiful results. At Rooster Windows and Doors, LLC, we deliver energy-efficient, high-quality solutions built to last. Explore our professional door installation services to transform your home with precision craftsmanship and lasting value.

