

Is New Construction Window Installation in an Existing Home Right for You?
New construction window installation in existing home projects use a full-frame window with a nailing flange, even though the house is already built. It is usually the right choice when you are adding a window, changing the opening size, or removing an old frame with rot, water damage, or hidden drafts.
| Choose this option | When it makes sense |
|---|---|
| New construction, full-frame window | You need to expose framing, repair damage, resize an opening, or add a new window. |
| Replacement or insert window | The existing frame is sound, square, and dry, and you want to keep the siding and trim largely untouched. |
The key difference is not just the window itself. A flanged window must connect to the home’s sheathing, weather-resistant barrier, flashing, and siding so water can drain back outside. That extra work can protect the wall from leaks, which matters because windows can eventually let in water and modern insulated wall systems dry more slowly than many older homes.
I am Piotr Wilk of Rooster Windows and Doors, LLC, and our team has more than two decades of residential window and door installation experience across the Chicagoland area, including new construction window installation in existing home projects. Next, we will compare full-frame flanged windows with insert replacements so you can see which approach fits your home.
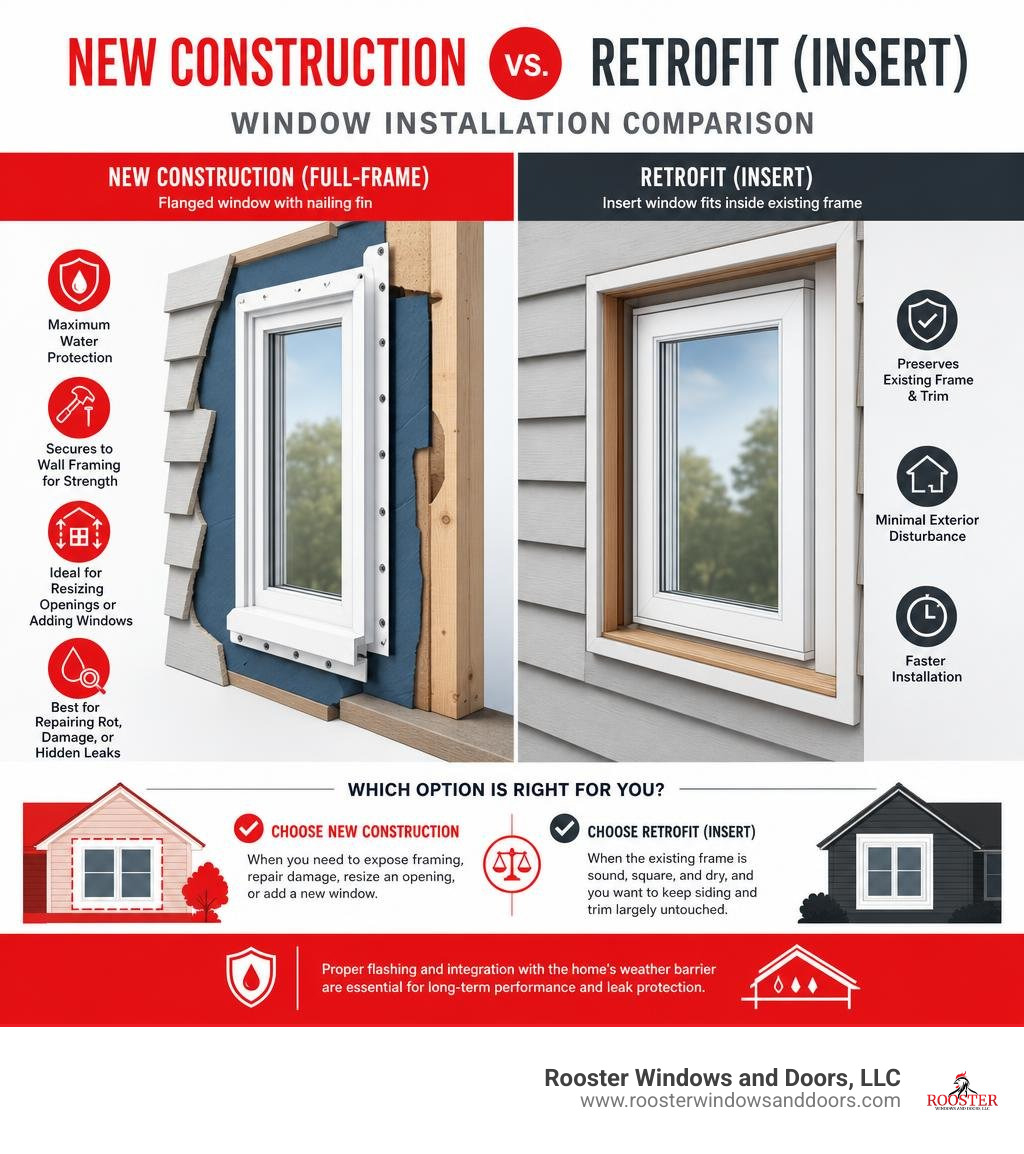
Comparing New Construction vs Replacement Windows
When planning a window upgrade in an existing house, homeowners often wonder whether they should use an insert replacement unit or perform a full-frame installation using a flanged new construction window. Understanding the structural differences between these two options ensures you make an informed decision for your home’s envelope integrity.
A new construction window features an integrated perimeter vinyl or aluminum rim known as a nailing fin or nailing flange. This flange is designed to sit flat against the exterior exterior wall sheathing and studs, allowing installers to fasten the unit structurally to the home’s framing using pan-head screws or corrosion-resistant nails. Because the flange sits behind the exterior cladding, integrating a flanged window requires removing or cutting back existing exterior siding and building paper.
Conversely, a standard replacement window (often called an insert pocket window) lacks a nailing flange. It is designed to slide directly into the preserved wooden jamb box of your old window frame after the old moving sashes and interior stops are removed. While this avoids disturbing exterior siding, it leaves the original framing, sill, and weather barrier uninspected.
| Feature | New Construction Flanged Window | Insert Replacement Window |
|---|---|---|
| Attachment Method | Fastened via nailing fin directly to wall sheathing & framing | Fastened through side jambs into existing window frame |
| Siding Removal | Required (cut back 3–4 inches or removed) | None required |
| Glass Surface Area | Preserves or expands original glass area | Slightly reduces glass area due to double-frame thickness |
| Moisture Inspection | Full exposure of framing, stud cavity, and rough sill | Limited to visible interior frame surfaces |
| Water Barrier Integration | Integrated directly into building housewrap & sill pan | Relies on exterior caulk joints between old frame & siding |
For a complete breakdown of structural window techniques, check out our Step-by-Step Window Installation Guide.
When to Choose Insert Replacement Windows
Insert replacement windows excel in scenarios where the existing window frame, sill, and exterior trim are completely sound, plumb, square, and free of moisture damage. If your current wooden window jambs show zero signs of wood rot, insect infestation, or past water leakage, an insert window offers a quick and clean installation.
Because insert installations do not require cutting back exterior lap siding, masonry, or interior casings, they are generally less labor-intensive. In multi-window projects across Northbrook or Highland Park, experienced installation crews can swap out multiple insert windows in a single day.
However, insert windows rely heavily on exterior sealant joints between the original exterior trim and the new window frame. If an existing frame is out-of-square or hides historical leaks, inserting a new window will not fix the underlying structural issue. Explore our Complete Guide to Installing Replacement Windows to see if insert units align with your project goals.
Why Perform a New Construction Window Installation in Existing Home Wall
Opting for a new construction window installation in existing home wall cavity becomes mandatory when you are creating a fresh wall cutout, expanding an existing window opening, or repairing hidden structural damage.
In older homes—such as historic properties in Evanston or 1970s split-levels in Schaumburg—years of unmitigated sill leaks can rot framing studs, jack studs, and floor joists. An insert window cannot address hidden rot. Performing a full-frame tear-out down to the rough framing allows us to replace rotted wood, rebuild structural headers, and install proper weather management systems.
Furthermore, building science reveals a stark contrast between historic and modern homes:
- Historic Homes (1920s–1950s): Homes built with uninsulated plaster walls and solid dimension lumber had massive moisture-holding capacity. When minor window leaks occurred, wall cavities dried out naturally due to constant air movement.
- Modern & Remodeled Homes: Modern walls filled with dense insulation, OSB sheathing, and vapor barriers have very low drying capacity. If water penetrates the wall cavity behind an improperly flashed window, moisture remains trapped, leading to structural wood decay within a few seasons.
Over 90% of windows installed across American homes historically lacked a dedicated sill pan underneath them, leaving them vulnerable to water intrusion over their 50-year operational lifespan. Utilizing a flanged new construction window allows us to build a robust drainage plane directly over the wall sheathing. For step-by-step insights on adding light to dark rooms, read our Adding Windows to a House Guide.
Framing and Rough Opening Preparation
Proper framing ensures your new window fits securely, operates smoothly without binding, and supports structural loads safely.
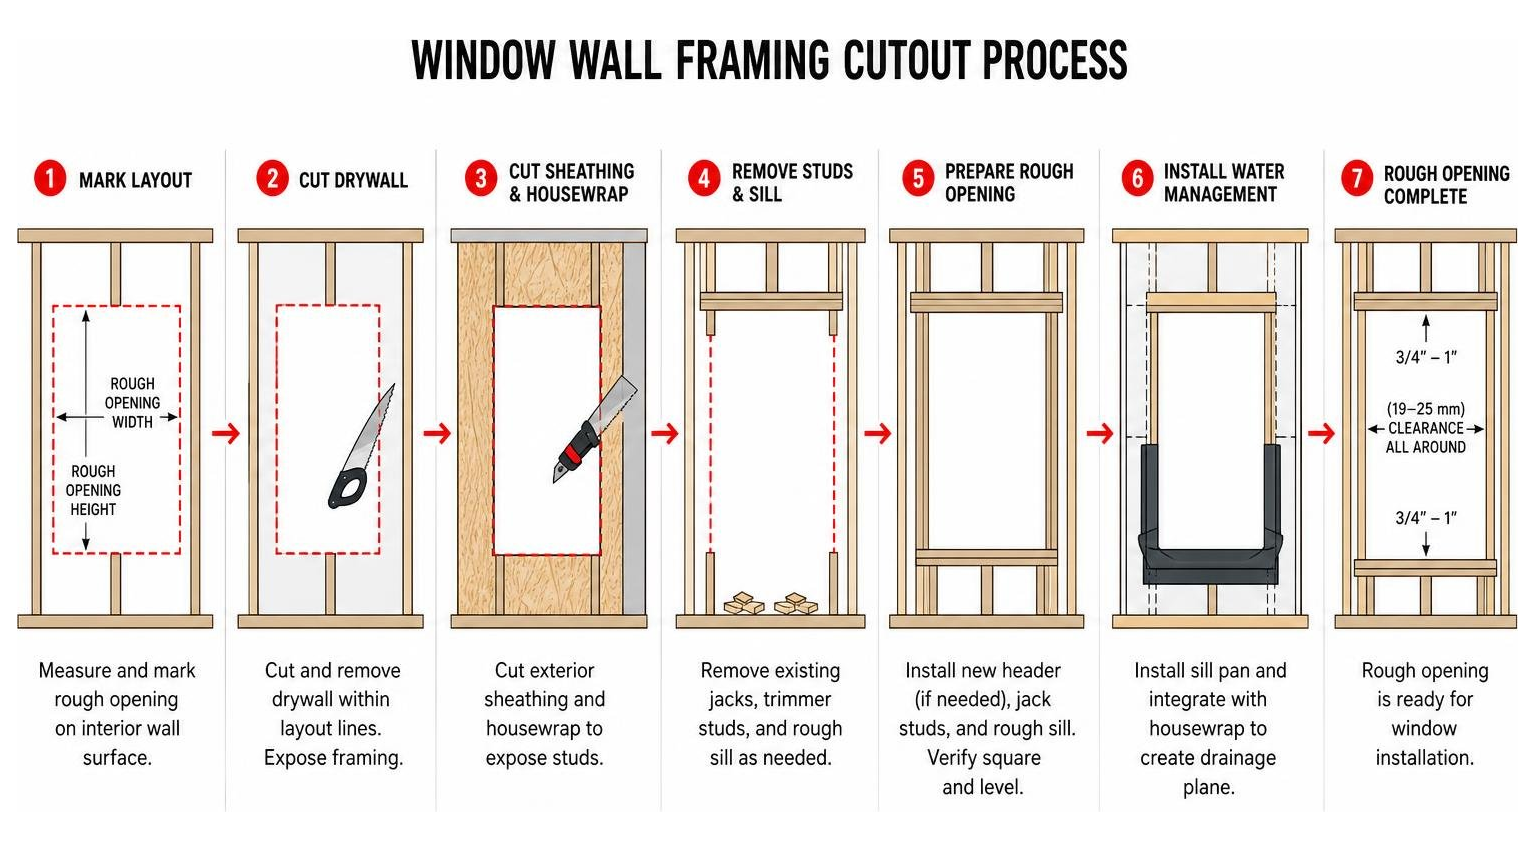
When sizing a rough opening for a new construction flanged window, standard industry protocol requires the rough opening to be between 3/4 inch (19mm) and 1 inch (25mm) larger than the total width and height of the window frame unit (or at least 1/2 inch larger in minimal clearance applications). This clearance allows sufficient space for leveling composite shims, thermal frame expansion, and low-expansion foam insulation.
When cutting a brand-new opening in an existing wall, wall loads must be calculated. The basic anatomical framing members for a window rough opening include:
- King Studs: Full-height vertical studs running from the bottom plate to the top plate that flank the sides of the opening.
- Jack Studs (Trimmer Studs): Inner vertical studs cut to fit beneath the header, taking the direct weight of the structural load above.
- Header: A heavy beam spanning the top of the opening, sized according to wall span and load-bearing requirements (typically doubled 2×8, 2×10, or engineered LSL beams).
- Rough Sill: The horizontal bottom framing member supported by cripple studs beneath.
Before cutting into interior drywall or exterior sheathing with a reciprocating saw, always inspect stud bays for hidden mechanicals, electrical wires, or plumbing pipes. If utilities exist in the bay, they must be safely relocated by qualified trades before cutting structural studs.
Preparing Wall Sheathing for New Construction Window Installation in Existing Home
To integrate a flanged window correctly into an existing structure, you must prepare the exterior building envelope. This requires cutting back existing lap siding, vinyl cladding, or trim 3 to 4 inches away from the perimeter of the opening to expose the bare wall sheathing.
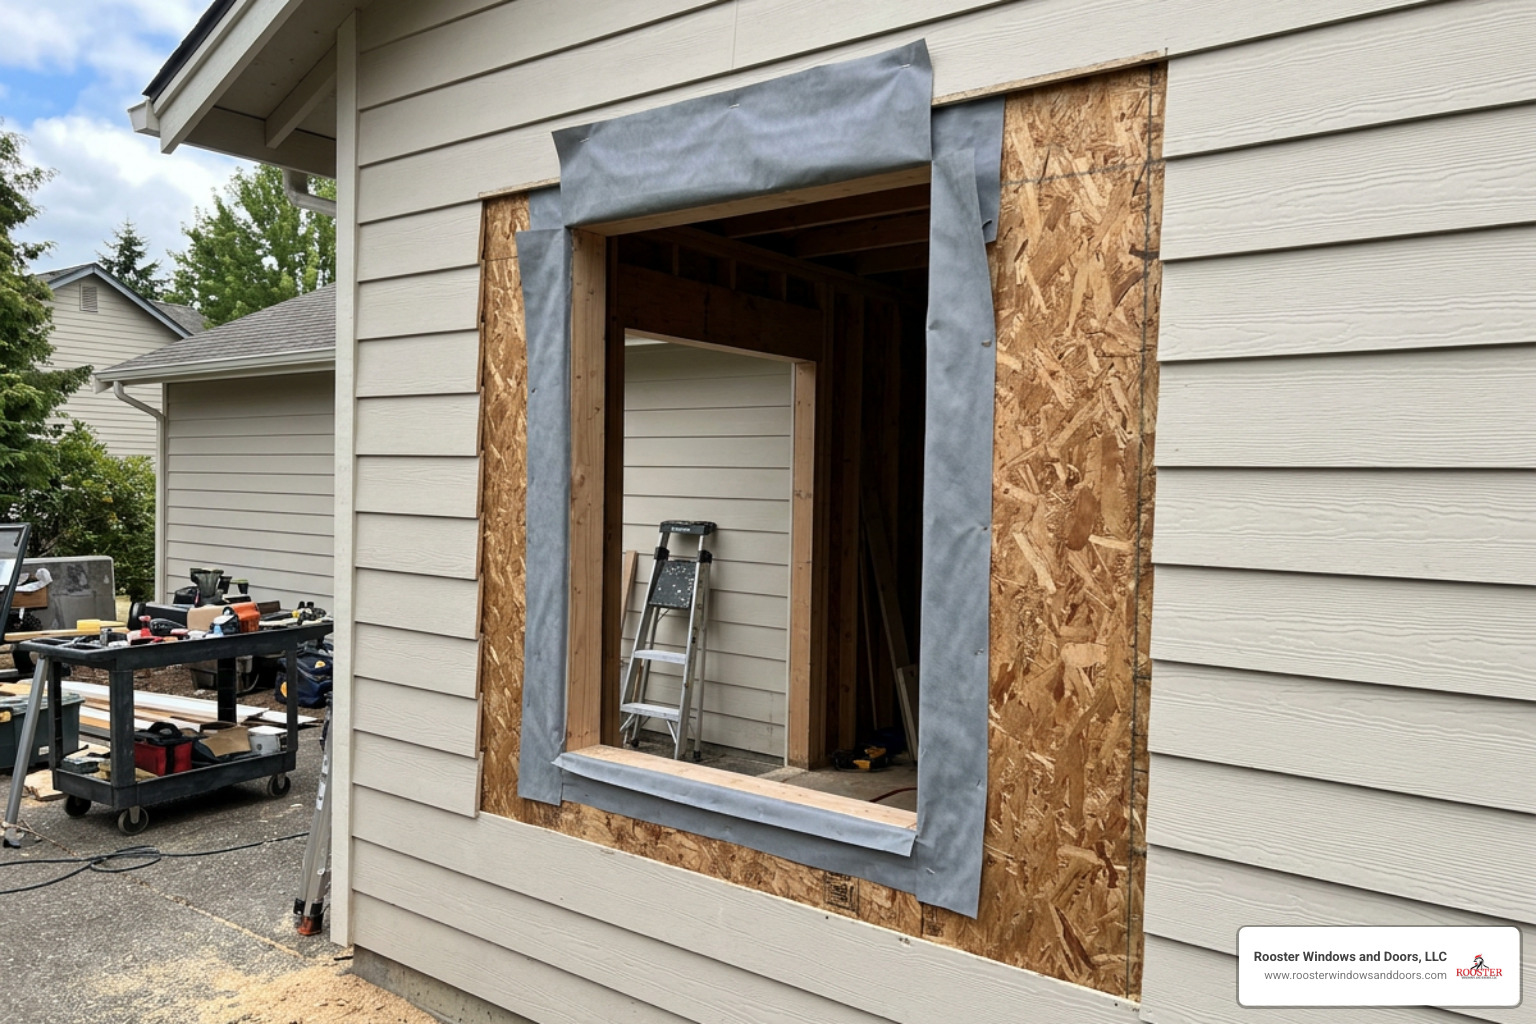
Once sheathing is exposed, prepare the existing weather-resistant barrier (WRB), such as housewrap or 30-pound asphalt felt paper:
- The Modified Box Cut: Make a horizontal cut along the top of the rough opening WRB, extending 45-degree diagonal slits outward from the top corners roughly 6 inches up.
- Temporary Head Flap: Fold this upper WRB flap upward and secure it temporarily with painter’s tape. This creates an overlapping flap that will drop down over your head flashing tape later.
- Side Cutbacks: Trim the WRB back 1 1/2 inches along the side jambs so your flexible flashing tape achieves a direct, permanent bond to the wall sheathing.
Lead Paint Warning: For homes constructed prior to 1978 (common in communities like Lake Forest, Arlington Heights, or Chicago), cutting into original wood casing and window frames can create hazardous lead dust. Standard EPA Lead-Safe Work Practices must be followed, including dust containment tarps and HEPA vacuuming. To evaluate complete envelope options, explore our Full Frame Installation Services.
Special Considerations for Brick and Masonry Walls
Replacing or adding a flanged window in a home with brick veneer or solid masonry walls—frequent across Buffalo Grove and Glenview—presents unique trade challenges. Because you cannot easily peel back rigid brickwork to nail a flange, custom framing details are required.
To install a flanged new construction window inside an existing brick opening without tearing down exterior brickwork, contractors pack out the inner rough opening:
- Shrinking the Inner Framing: Line the masonry opening with 1x or 2x framing lumber, reducing the inner wood rough opening dimensions so that the window unit’s exterior nailing flange rests snugly inside the brick opening perimeter.
- Grinding Mortar Protrusions: Use an angle grinder equipped with a diamond wheel and a masonry chisel to flush out uneven mortar fins along the inner brick wythe.
- Building Paper Integration: Use a stiff drywall taping knife to carefully slide self-adhered flashing membranes behind the aged building paper concealed behind the brick veneer.
For deeper technical methods regarding masonry openings, consult the guide to Install a Replacement Window in a Brick House.
Step-by-Step New Construction Window Installation in Existing Home
Executing a flawless installation requires following strict flashing sequences. Remember: water flows downhill under gravity. Every flashing layer must overlap the layer beneath it in a shingle-fashion sequence.
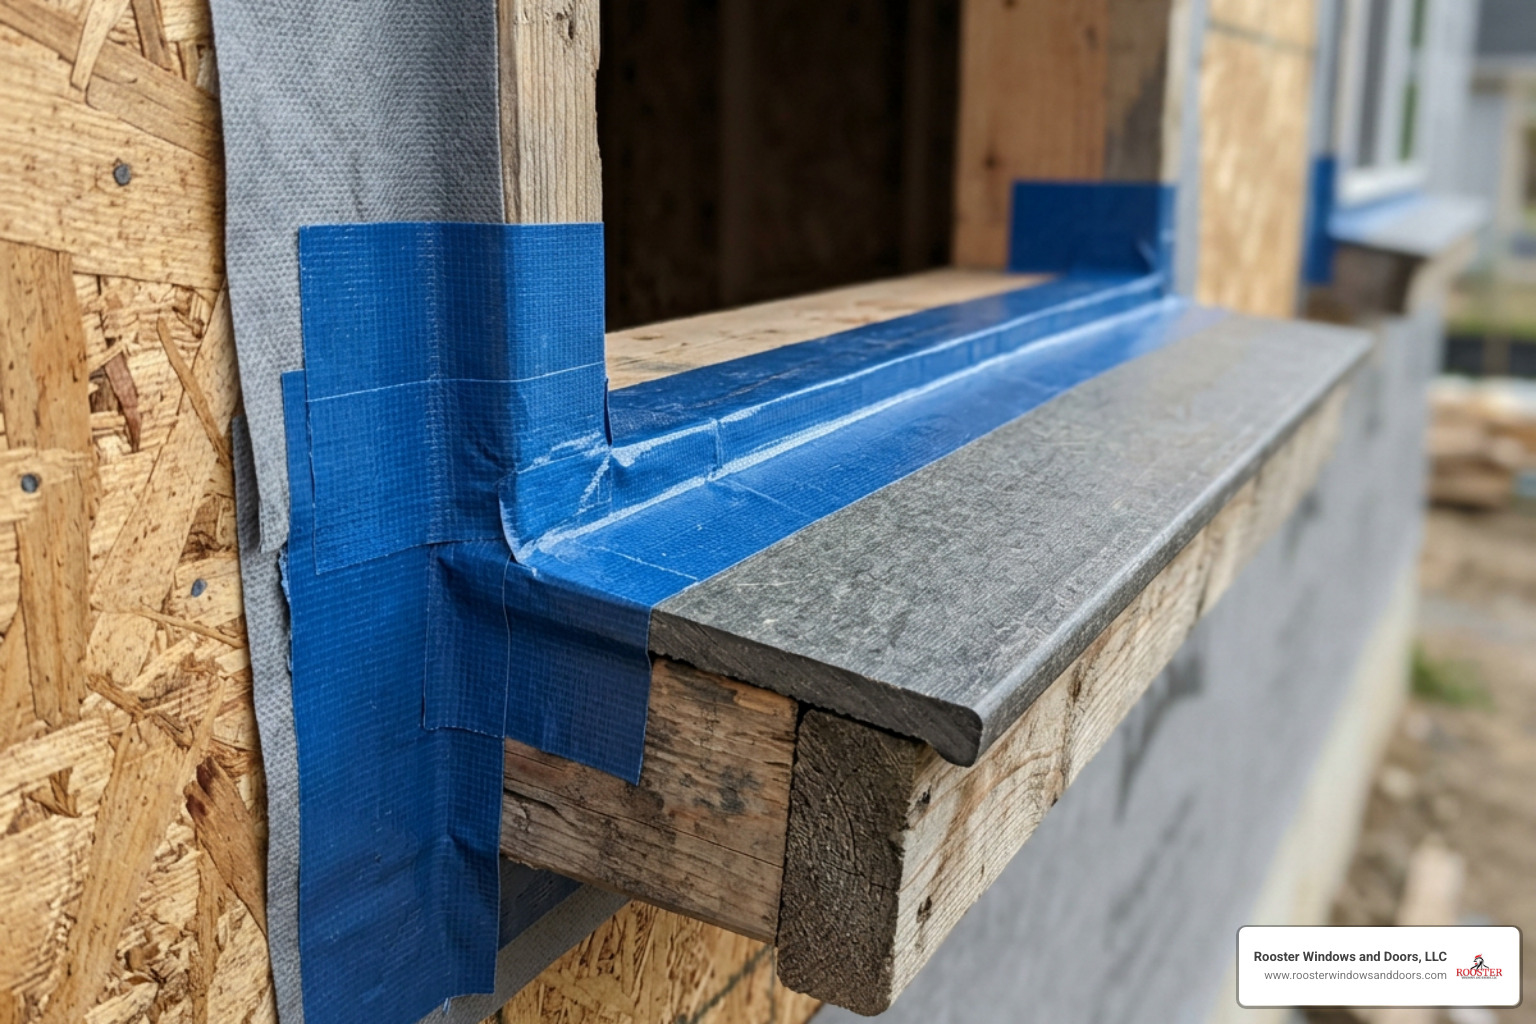
Flashing Techniques for New Construction Window Installation in Existing Home
The single most vital component of a leak-free window assembly is a sloped, site-built sill pan. Never set a window flat on a raw wooden rough sill.
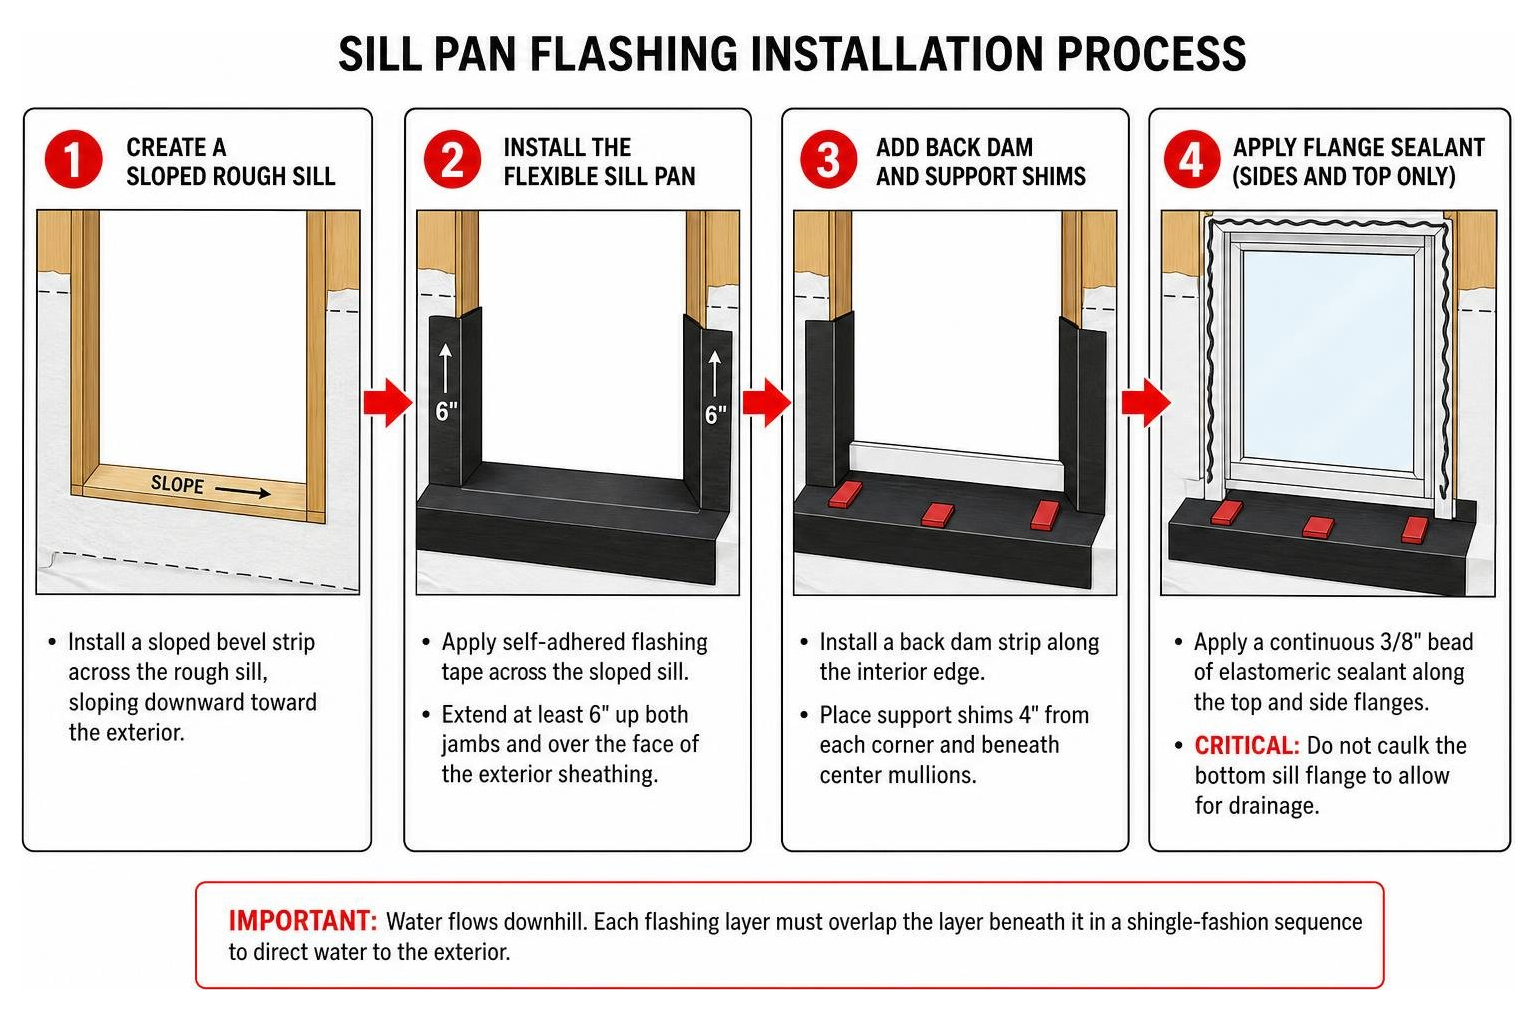
Here is the exact flashing sequence for maximum weatherproofing:
- Create a Sloped Rough Sill: Install a sloped bevel strip (or sloped cedar shim) across the horizontal bottom rough sill, sloping downward toward the exterior wall plane.
- Install the Flexible Sill Pan: Apply a self-adhered flexible butyl or rubberized asphalt flashing tape (such as DuPont FlexWrap) across the sloped sill. Extend the tape continuous across the bottom, wrapping it at least 6 inches up both vertical jambs and extending it over the face of the exterior wall sheathing.
- Add Back Dam and Support Shims: Install a low-profile vinyl corner guard or back dam strip along the interior edge of the sill pan to prevent blown rain from spilling inward. Place high-impact composite shims on the sill 4 inches from each corner and beneath central mullions.
- Flange Sealant Application (Sides and Top Only): Apply a continuous 3/8-inch bead of high-grade elastomeric sealant along the back side of the window’s top and side nailing flanges. CRITICAL: Do NOT caulk the bottom sill flange. Leaving the bottom flange uncaulked and elevated slightly on shims creates a dedicated drainage path for incidental moisture to escape safely.
- Apply Side Jamb Flashing: After setting and securing the window, apply self-adhered jamb flashing tape over the vertical side flanges. Ensure it extends 1 inch above the top flange and overlaps the bottom sill pan tape.
- Apply Head Flashing & Integrate WRB: Install a rigid aluminum or vinyl metal drip cap over the top window trim/flange. Apply head flashing tape directly over the top flange, extending past the side jamb tape. Finally, release the temporary top housewrap flap and fold it down over the head flashing, sealing the diagonal seams with flashing tape.
For manufacturer-specific flashing formulas, review the Loewen Window Installation Guide.
Setting, Leveling, and Air-Sealing the Window Assembly
With two installers handling the unit safely, set the window into the prepared rough opening.
- Fastening: Secure the top corner of the flange using 1 1/2-inch #8 stainless steel or pan-head wood screws driven into pre-punched flange holes.
- Shimming and Squaring: From the interior, insert composite shims behind every other nail hole along the side jambs. Check diagonal corner-to-corner measurements to ensure the frame is square within 1/16 inch. Verify plumb and level across all tracks.
- Fastener Pattern: Drive screws through every other hole along the flange (or every hole in designated high-wind zones). Avoid over-tightening screws, which can bow vinyl window tracks.
- Interior Air Sealing: From the interior side, apply a continuous 2-inch bead of AAMA-approved low-expansion, low-pressure polyurethane window and door foam into the cavity between the window frame and framing studs. Never use high-pressure expanding foams, which will bow the window frame and jam sash operation.
This interior foam bead establishes a tight air seal while leaving the exterior sill pan drainage path fully open to the outside. A blower door test conducted after proper low-expansion foam installation confirms zero draft intrusion around the perimeter box.
Exterior Finishing and Siding Reinstallation
Once the new construction window is securely fastened, flashed, and insulated, the exterior wall must be closed in and finished for maximum curb appeal and weather protection.
To re-integrate exterior siding around your flanged window:
- Cellular PVC Casing: Install cellular PVC exterior trim or custom aluminum cladding over the exposed nail flanges. Size PVC trim 1/4 inch undersized overall to allow a clean 1/8 inch expansion joint between the trim and window frame.
- Siding Channels (J-Bead): If working with vinyl or aluminum siding in homes across Palatine or Des Plaines, install matching J-channel trim around the perimeter of the casing to accept the cut edges of the siding panels cleanly.
- Backer Rod and Caulking: Insert a 3/8-inch deep foam backer rod into the perimeter gap between exterior trim and siding. Fill the joint with high-grade elastomeric sealant. Ensure sealant joints are smoothed with a tooling knife.
- Clear Weep Voids: Confirm that no caulk, paint, or exterior trim covers the bottom weep holes of the vinyl window frame or blocks the lower sill pan drainage gap.
Learn more about complete exterior finishing options in our Window Installation Services Guide.
Frequently Asked Questions About Window Installations
Should you caulk the bottom exterior flange of a new construction window?
No, you should never apply caulk or sealant across the exterior bottom flange of a flanged window. Caulking the bottom flange traps incidental water inside the wall opening if the window unit or glass seal ever leaks over its lifespan. Leaving the bottom flange uncaulked—and elevating the frame slightly on composite shims—allows water to flow across the sloped sill pan and weep out harmlessly to the home’s exterior.
How much larger should a rough opening be than the window unit?
The standard industry recommendation is to size the rough framing opening 3/4 inch to 1 inch larger than the overall width and height of the window unit (providing roughly 3/8 inch to 1/2 inch clearance on all four sides). This gap provides essential space for adjusting composite shims to level the frame, allows for seasonal thermal expansion of vinyl and wood materials, and creates room for proper interior low-expansion spray foam insulation.
What is the biggest challenge when installing flanged windows in brick houses?
The single biggest challenge is integrating the window’s exterior nailing flange with the rigid masonry cutout and the home’s existing building paper hidden behind the brick veneer. Because brick cannot be peeled back like vinyl siding, contractors must either trim mortar and shrink the inner wood framing using 1x/2x lumber to recess the flange inside the opening, or use advanced brickmould systems with hidden structural casing channels.
Conclusion
Choosing a new construction window installation in existing home project guarantees building envelope integrity, long-term structural protection, and ultimate peace of mind. While insert replacement windows offer a convenient solution for sound, undamaged openings, full-frame flanged installations are the gold standard whenever rot, draftiness, or framing changes are involved. By constructing sloped sill pans, following shingle-fashion flashing protocols, and sealing interior gaps with low-expansion polyurethane foam, your home stays warm, energy-efficient, and leak-free for decades.
At Rooster Windows and Doors, LLC, our team brings decades of experience to homeowners across Libertyville, Lake Zurich, Barrington, Highland Park, and the surrounding Chicagoland area. We provide flawless window and door installations tailored to your home’s unique architectural requirements. Ready to upgrade your home with energy-efficient windows? Connect with our team today for Professional Window Installation Services.

