

Tools, Materials, and Prep Work for Folding Doors
To install a folding closet door, measure the rough opening, attach the pivot pins and guide wheels to the door panels, mount the overhead track and bottom jamb bracket, hang the door by setting the pivot pins into their sockets, and adjust the alignment for smooth operation. Proper workspace prep and accurate measurements ensure the balanced track-and-pivot mechanism glides cleanly without binding or dragging against the frame or floor.
A thorough inspection of the rough opening ensures the finished frame is sturdy, structurally sound, and capable of holding the track fasteners securely.
Essential Tools: How to Install a Folding Closet Door Successfully
Having the right tools ready prevents mid-project delays. Most standard bifold door kits come packaged with mounting tracks, pivot pins, top guide rollers, snuggers, and floor jamb brackets. However, you will need standard carpentry and fastening tools to assemble and align everything accurately.
To install folding closet doors properly, assemble the following tools and supplies:
- Cordless drill/driver with 3/4-inch, 7/16-inch, and 7/64-inch drill bits
- Tape measure
- 4-foot carpenter’s level and torpedo level
- Hacksaw (for cutting aluminum tracks)
- Hammer
- Phillips-head and flat-head screwdrivers
- Adjustable wrench or open-end wrench (for bottom pivot adjustment)
- Wood filler and putty knife (for patching old screw holes)
- Safety glasses and work gloves
Measuring and Removing Old Closet Doors
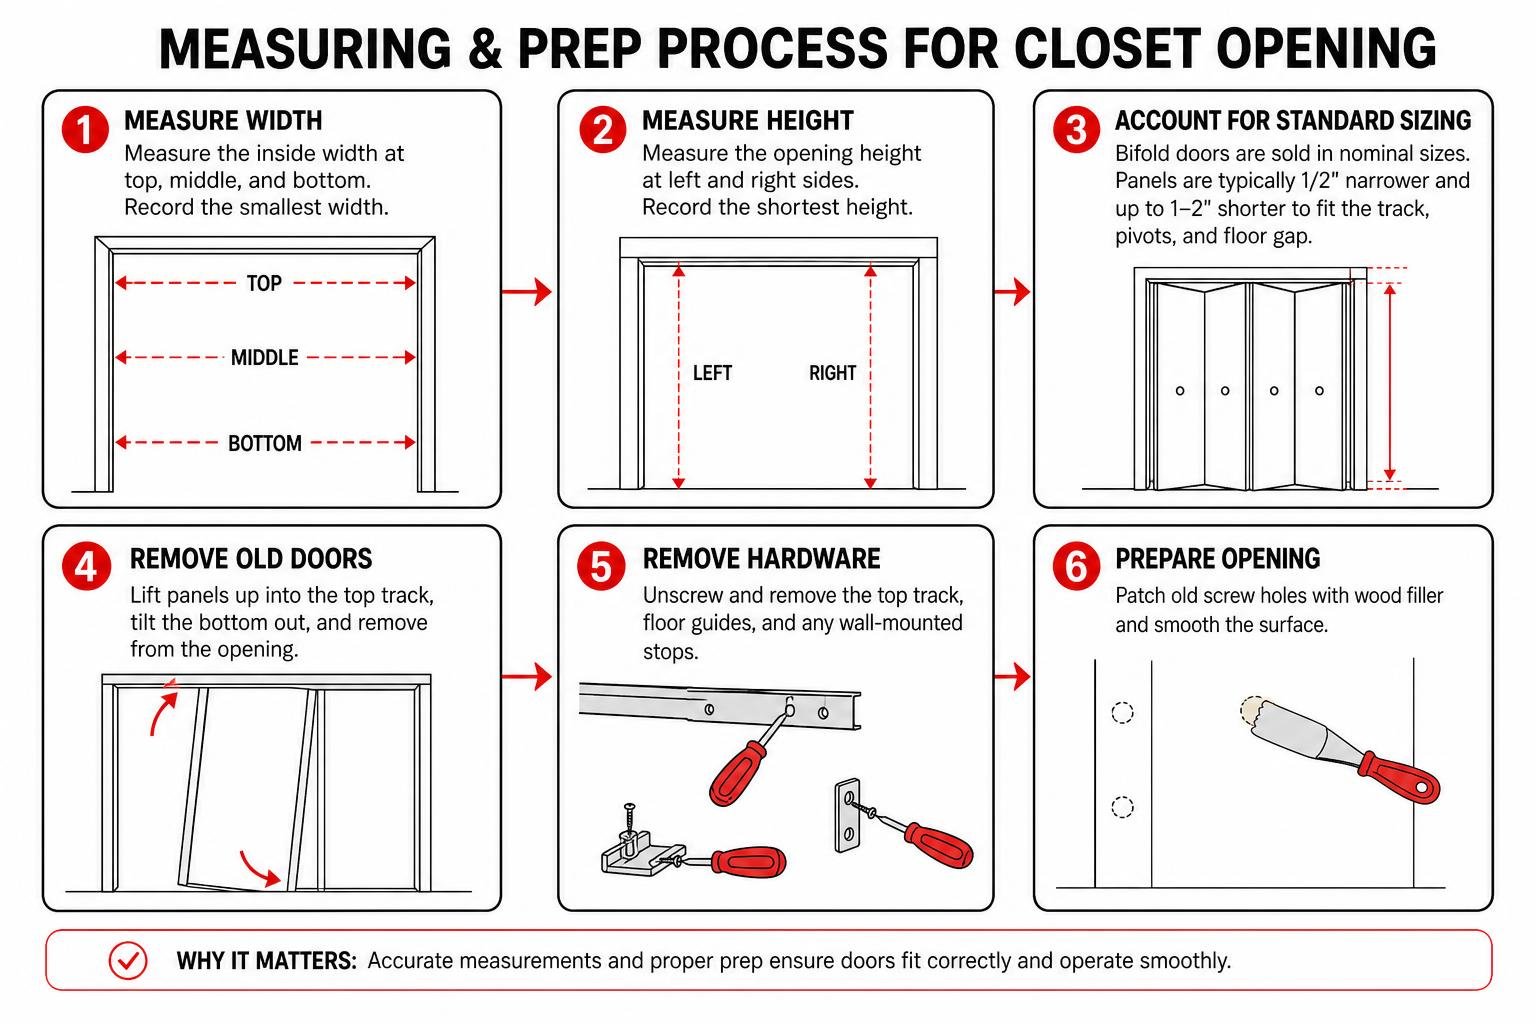
Accurate measurements prevent buying doors that scrape the floor or leave large gaps around the frame. Closet framing is rarely perfectly square, so taking multiple dimensions across the opening is necessary.
- Take a three-point width measurement: Measure the horizontal distance inside the door frame at the top, middle, and bottom. Record the smallest measurement.
- Measure the opening height: Measure vertically from the underside of the top header jamb to the finished floor at both the left and right sides. Record the shortest height.
- Account for standard sizing: Bifold doors are sold in nominal sizes (such as 24, 30, 32, or 36 inches wide for single openings, and 48, 60, or 72 inches for double openings). The actual panels are manufactured slightly undersized (typically 1/2 inch narrower and up to 1 to 2 inches shorter) to accommodate the top track, pivot clearance, and floor gap.
If your closet currently features bypass doors, check our guide on sliding closet door installation to understand how overhead bypass tracks operate.
To remove old sliding doors, lift each panel upward into the top track, tilt the bottom edge toward you, and disengage the bottom rollers from the floor channel. Unscrew the overhead sliding track and floor guides, remove any wall-mounted stops, and use wood filler to repair previous fastener holes. For a broader walkthrough on opening preparation, consult our interior door replacement complete guide.
Step-by-Step: How to Install a Folding Closet Door in 6 Steps
Once the opening is clear, clean, and measured, you can begin the installation process. Following a logical sequence ensures that panels align squarely and glide without resistance.
Step 1: Prepping and Finishing the Door Panels
Painting or staining door panels is easiest when they are flat before hardware is attached. Working on sawhorses prevents paint runs and keeps hardware channels clear of excess finish.
- Set the bifold panels across two padded sawhorses.
- Sand any rough edges lightly and wipe away wood dust.
- Apply your primer and paint or stain to the front, back, and all four edges. Sealing the top and bottom end grain is essential to prevent moisture absorption and warping over time.
- Allow the doors to dry completely. Installing hardware on wet or tacky paint can cause pivot pins and hinges to stick or strip out.
Step 2: Attaching Pivots, Hinges, and Guide Hardware
Bifold door sets consist of two hinged panels: a pivot panel (which anchors near the wall jamb) and a guide panel (which glides along the overhead track).
- Identify factory holes: Most doors feature pre-drilled holes along the top and bottom edges. If your door is blank, drill 7/16-inch diameter holes that are 2 inches deep at the designated manufacturer marks.
- Install the top pivot pin: Tap the smooth or spring-loaded top pivot pin into the pre-drilled hole on the top edge of the pivot panel using a hammer until its collar rests flush against the wood.
- Insert the top guide wheel: Tap the spring-loaded roller or wheel guide into the top edge of the lead (guide) panel.
- Mount the bottom pivot: Tap the threaded bottom pivot pin assembly into the bottom hole of the pivot panel.
- Attach panel hinges: If your panels are not pre-hinged, place the two panels face down with a 1/16-inch gap between them. Install three hinges along the joint: one near the top, one near the bottom, and one centered between them. Pre-drill screw holes using a 7/64-inch bit to avoid splitting the wood.
For a helpful visual reference of these components, watch this Video walkthrough on bifold door hardware.
Step 3: Installing the Top Track and Bottom Jamb Bracket
The track guides the top rollers and carries the upper pivot socket, while the bottom jamb bracket supports the weight of the door assembly.
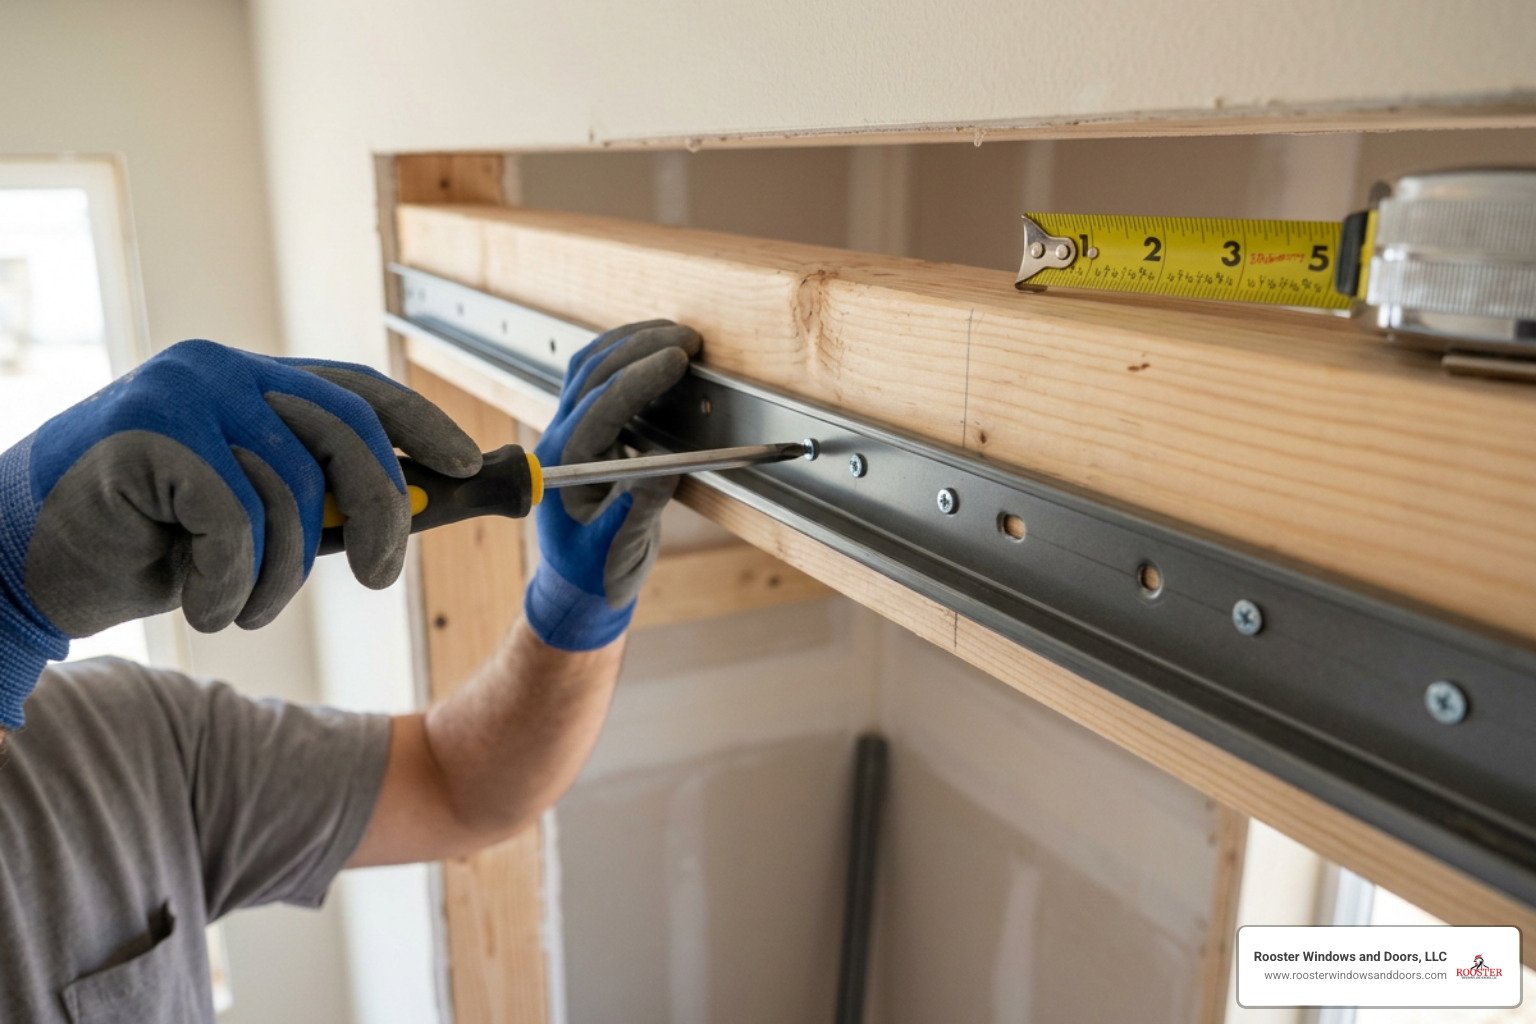
- Size the top track: Measure the top header opening. If needed, cut the aluminum track using a hacksaw so that it is 1/8 inch shorter than the opening (leaving roughly 1/16 inch of clearance on each end).
- Slide hardware into the track: Before securing the track, insert the rubber snugger and the top pivot bracket into the track channel.
- Mount the top track: Position the track along the top header jamb. Center it from front to back so the door panels sit flush with the finished wall opening. Drive 1-inch flat-head screws through the pre-punched track holes into the wooden header framing.
- Secure the bottom jamb bracket: Position the bottom pivot bracket against the side jamb at the floor. The center point of the bottom bracket must align vertically with the center line of the top track. Use a plumb line or a 4-foot level to verify alignment. Fasten the bracket into the side jamb and the subfloor using the provided wood screws.
Step 4: Hanging Panels: How to Install a Folding Closet Door on the Track
Hanging the assembled panels requires setting the top and bottom pivot pins into their respective brackets while securing the guide roller into the track channel.
- Fold the two door panels together so they form a tight “V” shape.
- Lift the assembly and guide the top pivot pin upward into the track’s top pivot socket.
- Seat the bottom threaded pivot pin into the teeth of the bottom floor jamb bracket.
- Depress the spring-loaded top guide wheel, slide it under the track opening, and release it so the wheel snaps into the upper guide channel.
- Test the initial swing. The door should fold smoothly toward the jamb without jumping out of the track.
For additional perspectives on fitting bifold panels, review this How to install bifold doors guide.
Step 5: Adjusting for Height, Level, and Plumb
Achieving consistent reveal gaps around the door frame requires fine-tuning both the top and bottom pivot brackets.
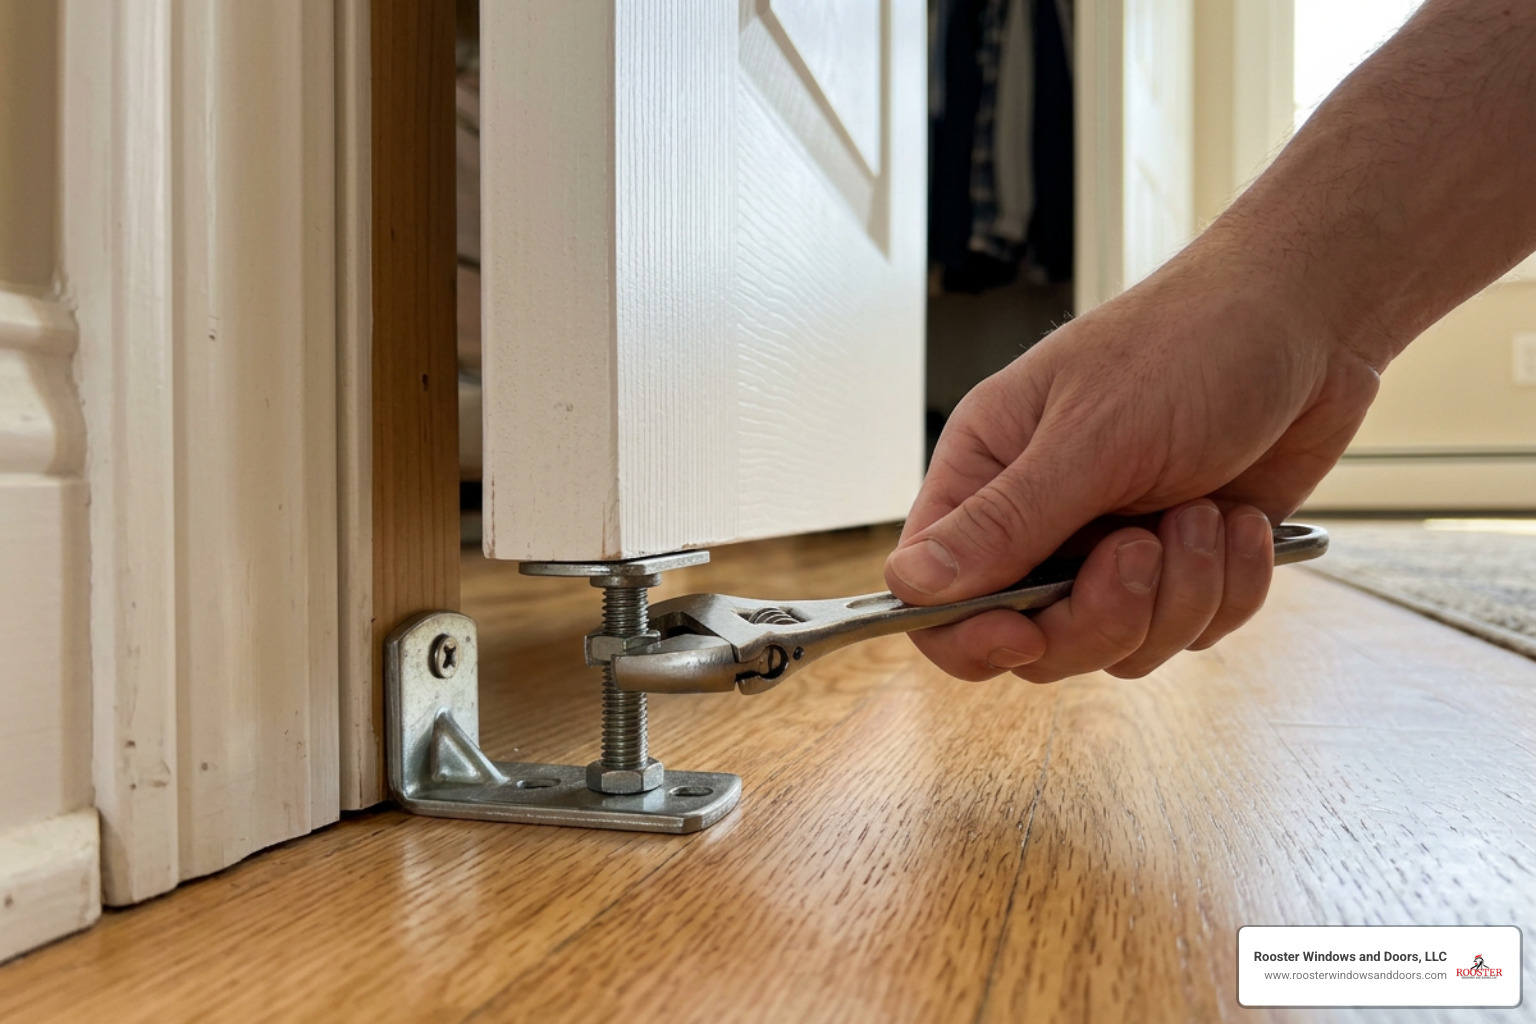
- Vertical Height Adjustment: Lift the door slightly to take the weight off the bottom bracket. Turn the threaded bottom pivot pin clockwise to raise the door or counterclockwise to lower it. Ensure the bottom edge clears the finished floor or carpet by roughly 3/8 to 1/2 inch.
- Plumb and Side Gap Alignment: Loosen the screw on the top pivot bracket inside the track. Slide the bracket horizontally toward or away from the side jamb until the door hangs plumb (checked with your level against the closed panel edge). Tighten the bracket screw firmly once aligned.
- Center Reveal (Double Doors): If installing a four-panel system across a wide opening, adjust both pairs until the gap between the two meeting center panels is even from top to bottom (around 1/8 to 3/16 inch).
Step 6: Installing Door Pulls, Knobs, and Aligners
The final hardware elements ensure the doors operate comfortably and stay flush when fully closed.
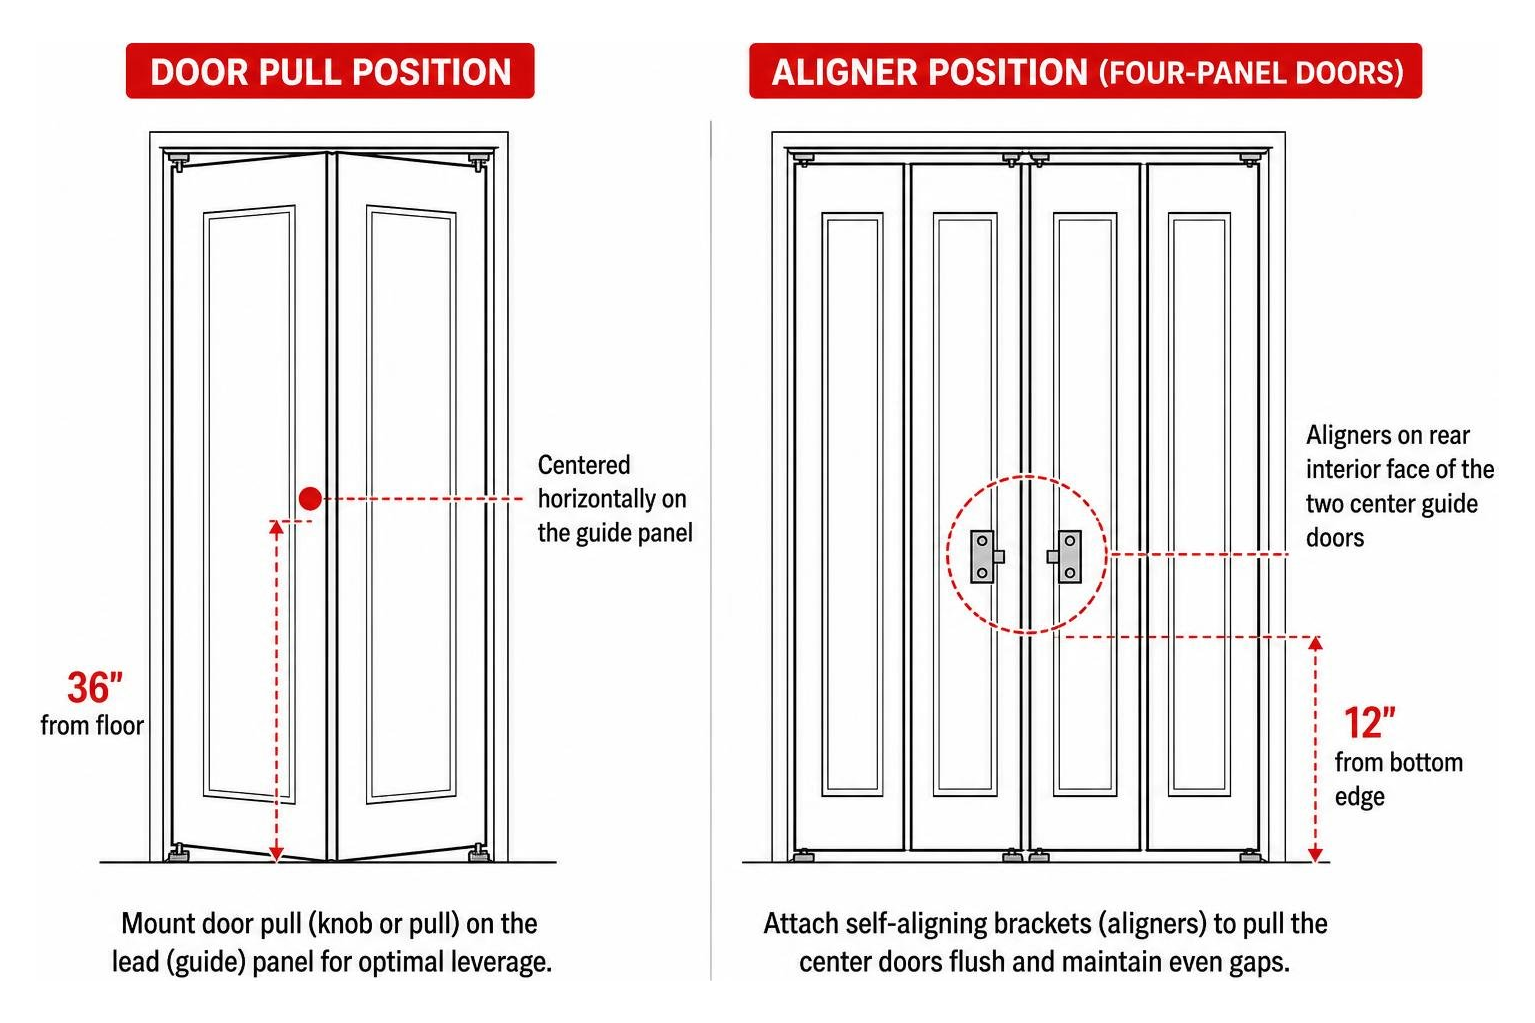
- Door Pull Installation: Standard door knobs or pulls on bifold doors should be mounted roughly 36 inches from the floor, centered horizontally on the lead (guide) door panel. Pre-drill a hole through the door with a 7/64-inch bit and secure the knob with its mounting screw from the rear. Placing the knob on the guide panel provides optimal leverage for folding the door open.
- Snap Aligners for Four-Panel Doors: For double-door configurations, attach self-aligning brackets (aligners) to the rear interior face of the two center guide doors, roughly 12 inches up from the bottom edge. These interlocking metal brackets pull the panels flush with one another when closed, preventing center sag or uneven gaps.
Comparing Standard Bifold Doors and Bifold Barn Doors
While standard interior bifold doors operate inside the finished frame using a recessed top track, modern bifold barn doors mount to an exterior wall track above the opening. If you are weighing different space-saving options like a pocket door or an exterior sliding setup, understanding hardware differences helps determine the best fit for your room layout.
| Feature | Standard Bifold Door | Bifold Barn Door |
|---|---|---|
| Mounting Location | Inside finished frame header | Exterior wall face above opening |
| Clearance Needed | Minimal interior swing footprint | Clear wall space above and adjacent |
| Hardware Visibility | Concealed aluminum track | Exposed decorative sliding hardware |
| Floor Brackets | Jamb/floor pivot bracket | Floor-mounted guide pins |
| Skill Level Required | Intermediate | Intermediate to Advanced |
| Best Application | Bedroom closets, laundry alcoves | Wide openings, decorative room dividers |
Frequently Asked Questions About Folding Closet Doors
How do you adjust a bifold closet door that is sticking or rubbing?
A sticking bifold door is usually caused by an out-of-square frame or a shifted pivot bracket. If the top edge rubs against the track, loosen the top pivot bracket screw and slide the door slightly away from the rubbing point, then retighten. If the bottom of the door drags on the flooring, lift the panel and rotate the threaded bottom pivot pin clockwise to raise the overall height until it glides freely.
Can you install folding closet doors over thick carpet?
Yes. When installing over thick pile carpeting, do not screw the bottom jamb bracket directly into the soft carpet pile, as this causes the door to tilt under weight. Instead, mount the bracket directly to the solid wooden side jamb just above carpet level, or place a sturdy solid wood block underneath the bracket, securing it directly to the subfloor for stable support.
Where should handles and door aligners be placed on bifold doors?
Door handles should be installed centered on the guide panel approximately 36 inches up from the finished floor. For double bifold setups, door aligners are attached to the closet-facing side of the two center panels, approximately 12 inches from the bottom edge, providing tension that keeps both door pairs flush when closed.
Conclusion
Installing a folding closet door is a practical weekend project that improves room accessibility and frees up usable floor space in tight bedrooms and laundry areas. Taking accurate three-point measurements, leveling the upper track, and adjusting the pivot pins will give you a clean, quiet, and smooth-gliding door system.
If your closet opening requires structural reframing, custom panel sizing, or whole-home door upgrades across Chicagoland, our team at Rooster Windows and Doors, LLC delivers precision craftsmanship. Explore our full range of options for professional door installation to bring long-lasting beauty and function to your home.

