

Why Installing an Egress Window in a Basement Is One of the Smartest Home Upgrades You Can Make
Installing an egress window in a basement transforms an unlivable, code-violating space into a legal bedroom — and it does it faster and for less money than most homeowners expect.
Here is a quick overview of what the process involves:
- Pull a permit from your local building department
- Call 811 to mark underground utilities before any digging
- Excavate the area outside the planned window location
- Cut the foundation wall using a concrete saw with a diamond blade
- Install a window buck (framing) and set the egress window level and plumb
- Install the window well and connect drainage to your home’s drain tile system
- Seal and flash the window to prevent water intrusion
- Schedule the inspection and finish the interior trim
The minimum IRC requirements your window must meet:
| Requirement | Minimum Standard |
|---|---|
| Net clear opening | 5.7 sq ft (5.0 sq ft at grade) |
| Minimum width | 20 inches |
| Minimum height | 24 inches |
| Maximum sill height | 44 inches from finished floor |
Without a compliant egress window, a basement room cannot legally be called a bedroom — which directly affects your home’s appraised value and resale price.
This is not a small project. Cutting through 8 to 10 inches of concrete requires specialized equipment, structural awareness, and proper waterproofing. Done right, it can add $15,000 to $30,000 in home value. Done wrong, it can flood your basement and fail inspection.
I’m Piotr Wilk, and over more than two decades of residential window installation in the Chicagoland area, I’ve guided countless homeowners through installing an egress window in a basement — from choosing the right window style to passing final inspection. In this guide, I’ll walk you through everything you need to know to get it done correctly.
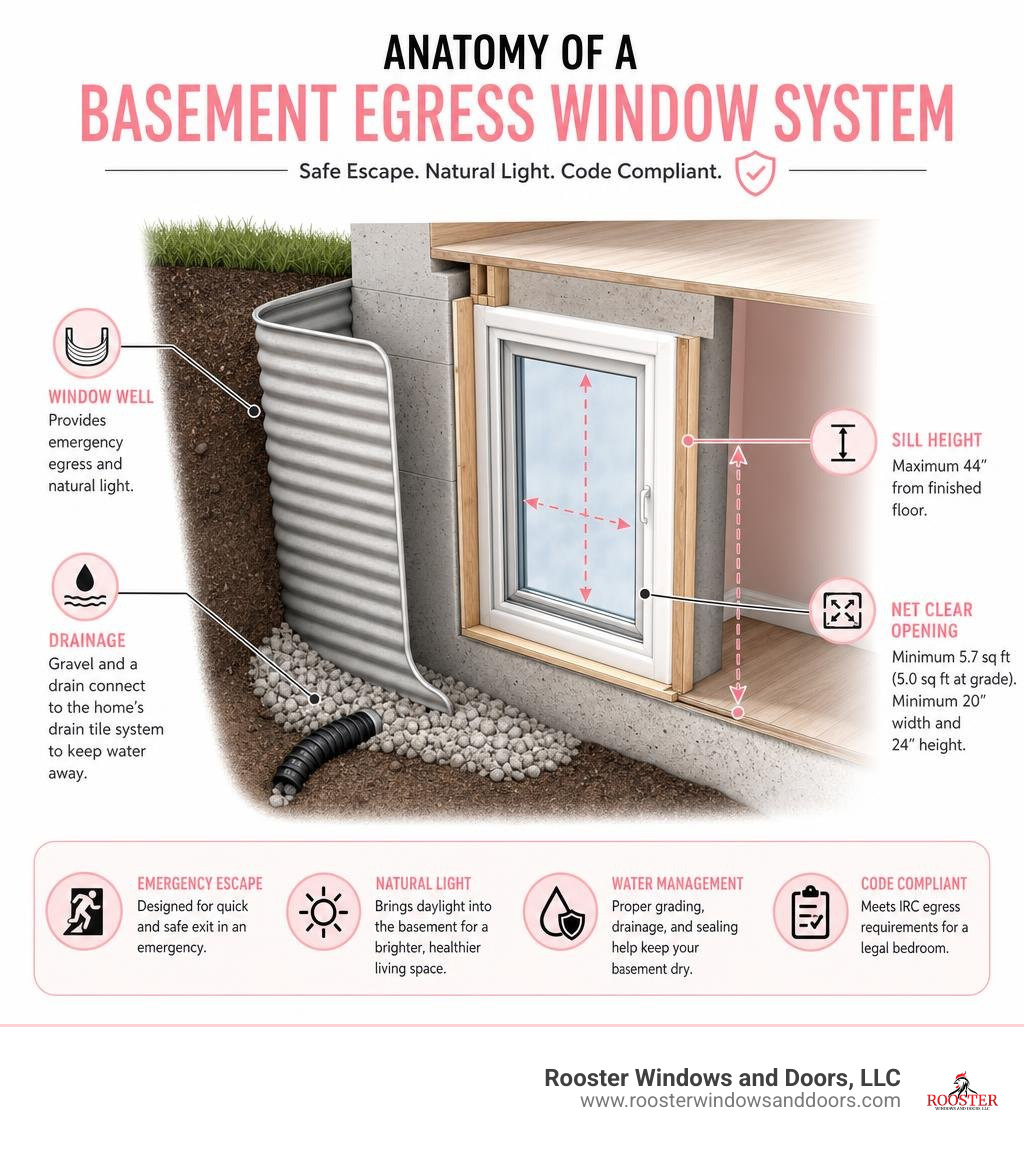
Essential installing an egress window in basement terms:
Understanding Egress Windows and IRC Code Requirements
Before you pick up a shovel or hire a contractor, we need to talk about the law. The International Residential Code (IRC) Section R310 dictates the exact rules for emergency escape and rescue openings. These rules are not arbitrary guidelines; they are strict life-safety codes designed to ensure a fully equipped firefighter can enter your basement with an oxygen tank on their back, and your family can quickly escape in a fire.
Many homeowners assume that a “rough opening” or the size of the window frame is what matters. In reality, building inspectors look exclusively at the net clear opening. This is the actual, completely unobstructed space created when the window sash is fully opened. If your window frame is large but the glass only slides open halfway, it will not meet the legal requirements.
Minimum Dimensions and Clearances
To comply with the IRC and pass local building inspections in communities like Libertyville or Arlington Heights, your window must meet these four critical thresholds:
- Net Clear Opening Area: A minimum of 5.7 square feet. If the window is at grade level (meaning the sill is flush with or slightly above the ground), this requirement drops slightly to 5.0 square feet. However, for almost all basement installations requiring an excavated well, the 5.7 square feet standard applies.
- Minimum Net Clear Opening Height: At least 24 inches.
- Minimum Net Clear Opening Width: At least 20 inches.
- Maximum Sill Height: No more than 44 inches from the finished basement floor.
It is important to note that you cannot simply multiply the minimum height (24 inches) by the minimum width (20 inches) and expect to meet the area requirement. A 24″ x 20″ opening is only 3.33 square feet. To achieve the required 5.7 square feet, either the height, the width, or both must be larger than the minimums. For a deeper look at these spatial calculations, see our Egress Basement Window Complete Guide.
Legal Requirements for a Basement Bedroom
Simply putting a bed in a basement does not make it a bedroom. To market your home with an additional legal bedroom in Illinois, the space must meet a series of strict municipal and code requirements beyond having an egress window:
- Ceiling Height: The finished ceiling must be at least 7 feet high. If there are ductways or beams, they must still provide a minimum clearance of 6 feet, 4 inches.
- Closet Space: While the IRC does not explicitly require a closet to define a bedroom, many local Chicagoland municipalities (such as Schaumburg or Glenview) and real estate boards require a built-in closet for the room to be officially listed as a bedroom.
- Ventilation and Natural Light: The room must have adequate natural light (typically equal to at least 8% of the floor area) and ventilation (at least 4% of the floor area). Handily, a properly sized egress window helps satisfy both of these requirements simultaneously.
- Heating: The bedroom must have a permanent heat source capable of maintaining a comfortable temperature without relying on portable space heaters.
For a comprehensive checklist on transforming your lower level, you can review our Complete Basement Windows Install Guide.
The Financial and Safety Benefits of Installing an Egress Window in Basement
While safety is the primary driver behind building codes, installing an egress window in a basement is also one of the most financially rewarding home improvement projects you can undertake. It is a rare upgrade where the immediate safety peace of mind is matched by a substantial bump in home equity.
Cost Breakdown and ROI
Let us look at the hard numbers for 2026. According to industry statistics, the nationwide average cost for a professionally installed basement egress window ranges from $3,850 to $4,200, with most homeowners spending between $2,700 and $5,900 depending on the complexity of the excavation and the foundation material.
However, adding a legal basement bedroom typically adds $15,000 to $30,000 to your appraised home value. This represents a 3-to-5-times return on your initial investment. Think about it: instead of spending $50,000+ on a home addition to get an extra bedroom, you can unlock existing square footage for a fraction of the cost.
| Component / Expense Type | DIY Material Cost Range | Professional Installed Cost Range |
|---|---|---|
| Window Unit (High-Quality, Vinyl/Low-E) | $250 – $600 | Included in package |
| Window Well (Steel, Composite, or Stone-Look) | $150 – $500 | Included in package |
| Excavation & Concrete Cutting Equipment Rental | $400 – $800 | Included in package |
| Drainage Components, Gravel, & Lumber | $200 – $400 | Included in package |
| Permits & Engineering Fees | $100 – $300 | $150 – $400 |
| Professional Labor & Waterproofing Warranty | N/A | $1,500 – $3,500 |
| Total Project Cost | $1,200 – $2,800 | $2,000 – $5,500 |
For an in-depth analysis of pricing variables and regional material costs, check out the comprehensive Egress Window Cost 2026: Basement Installation & Replacement Prices | The Basement Guide.
In addition to the equity boost, energy-efficient window installations qualify for financial incentives. Under federal energy guidelines in 2026, homeowners can claim a tax credit of up to $600 for installing qualified Energy Star windows. Combined with lower utility bills from modern double-pane Low-E glass, the long-term cost of ownership drops even further.
DIY vs. Professional: Is Installing an Egress Window in Basement Right for You?
Can you do this yourself? Technically, yes, if you are an advanced DIYer with heavy-duty construction experience. However, for most homeowners, this is not a weekend project.
The process requires digging out several cubic yards of heavy clay soil, renting a walk-behind concrete saw or a hydraulic ring saw to slice through 8 to 10 inches of solid, steel-reinforced concrete, and structural framing. If you make a mistake while cutting the foundation, you risk compromising the structural integrity of your entire home. Furthermore, if the waterproofing is not flawless, the next heavy rainstorm will turn your newly finished basement into an indoor swimming pool.
Hiring a professional team ensures the work is backed by a warranty, fully permitted, and engineered to pass municipal inspections. If you want to evaluate your own skills against the realities of the job, read Your Step-by-Step Guide to Egress Window Installation.
Choosing the Right Window Style and Well System
Selecting the right components is about balancing aesthetics, ease of operation, and code compliance. You want a window that looks beautiful from both the inside and outside, lets in maximum natural light, and opens effortlessly.
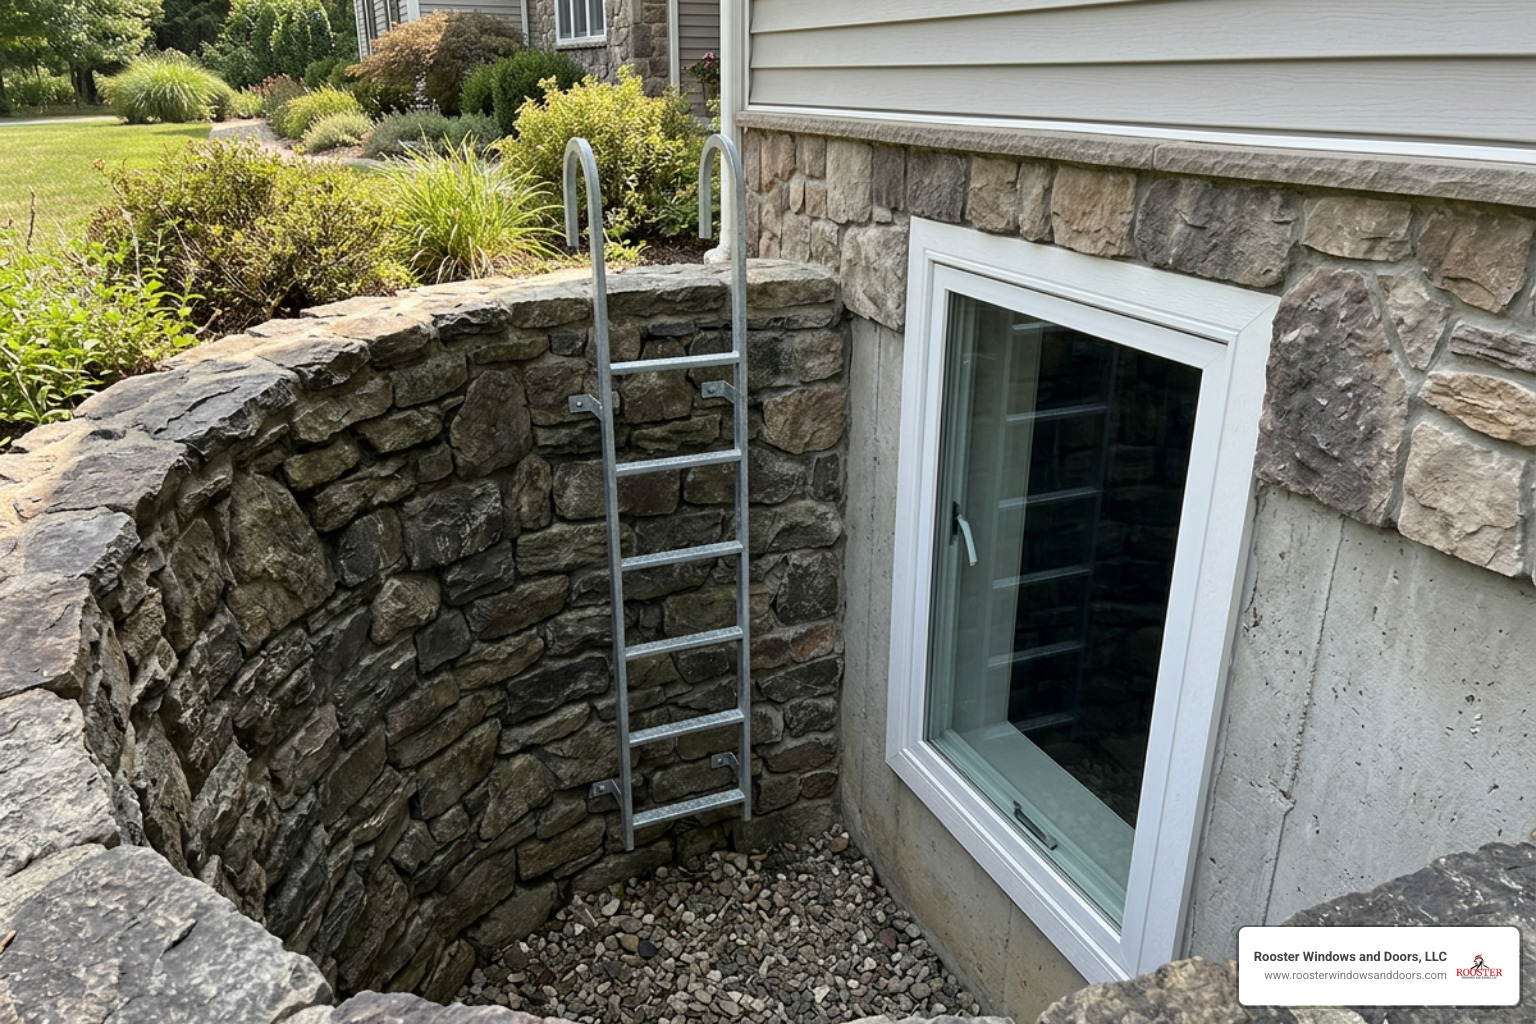
Best Window Styles for Basement Egress
Not all windows are created equal when it comes to below-grade installations. Here are the three most common styles:
- Casement Crank-Out Windows (The Clear Winner): Casement windows swing outward like a door. Because the entire sash swings out of the frame, they provide the maximum possible net clear opening. This means you can install a smaller overall window frame and still easily meet the 5.7 square feet code requirement. They are also incredibly energy-efficient, sealing tightly when cranked shut.
- Sliding Windows: Horizontal sliders are popular because they are simple and low-profile. However, because only half of the window opens at any given time, a sliding window must be roughly twice as wide as a casement window to provide the same net clear opening. This means you will have to cut a much wider hole in your foundation wall.
- In-Swing Casements: If you have limited clearance in your window well, an in-swing casement window is an excellent alternative. It opens inward into the basement, ensuring the sash never collides with the well wall or cover.
No matter which style you select, look for high-quality vinyl or fiberglass frames. These materials resist the moisture and temperature fluctuations common to below-grade environments. Ensure the glass is treated with a Low-E coating and filled with argon gas to keep your basement warm in our freezing Illinois winters and cool during humid summers. For more guidance on choosing window styles, read How to Install New Basement Window.
Window Well and Ladder Code Requirements
If your egress window is located below ground level—as most are—the IRC requires a code-compliant window well. The well must allow the window to open fully and provide a clear escape path to the surface.
- Minimum Horizontal Dimensions: The well must provide a clear floor area of at least 9 square feet, with a minimum horizontal projection (width from the foundation wall to the outer edge of the well) of 36 inches.
- Ladders and Steps: If the depth of the window well exceeds 44 inches, a permanently attached ladder or step system must be installed. The ladder must be at least 12 inches wide, project at least 3 inches from the well wall, and have rungs spaced no more than 18 inches apart.
- Covers and Grates: You can install a cover or grate to keep out leaves, debris, and pests (such as those offered by Mundelein Window Well Covers), but it must be easily removable from the inside without the use of a key, tool, or special knowledge.
The Complete Installation and Waterproofing Process
Installing a below-grade window is a highly coordinated process. It requires careful planning, heavy machinery, and precise execution.
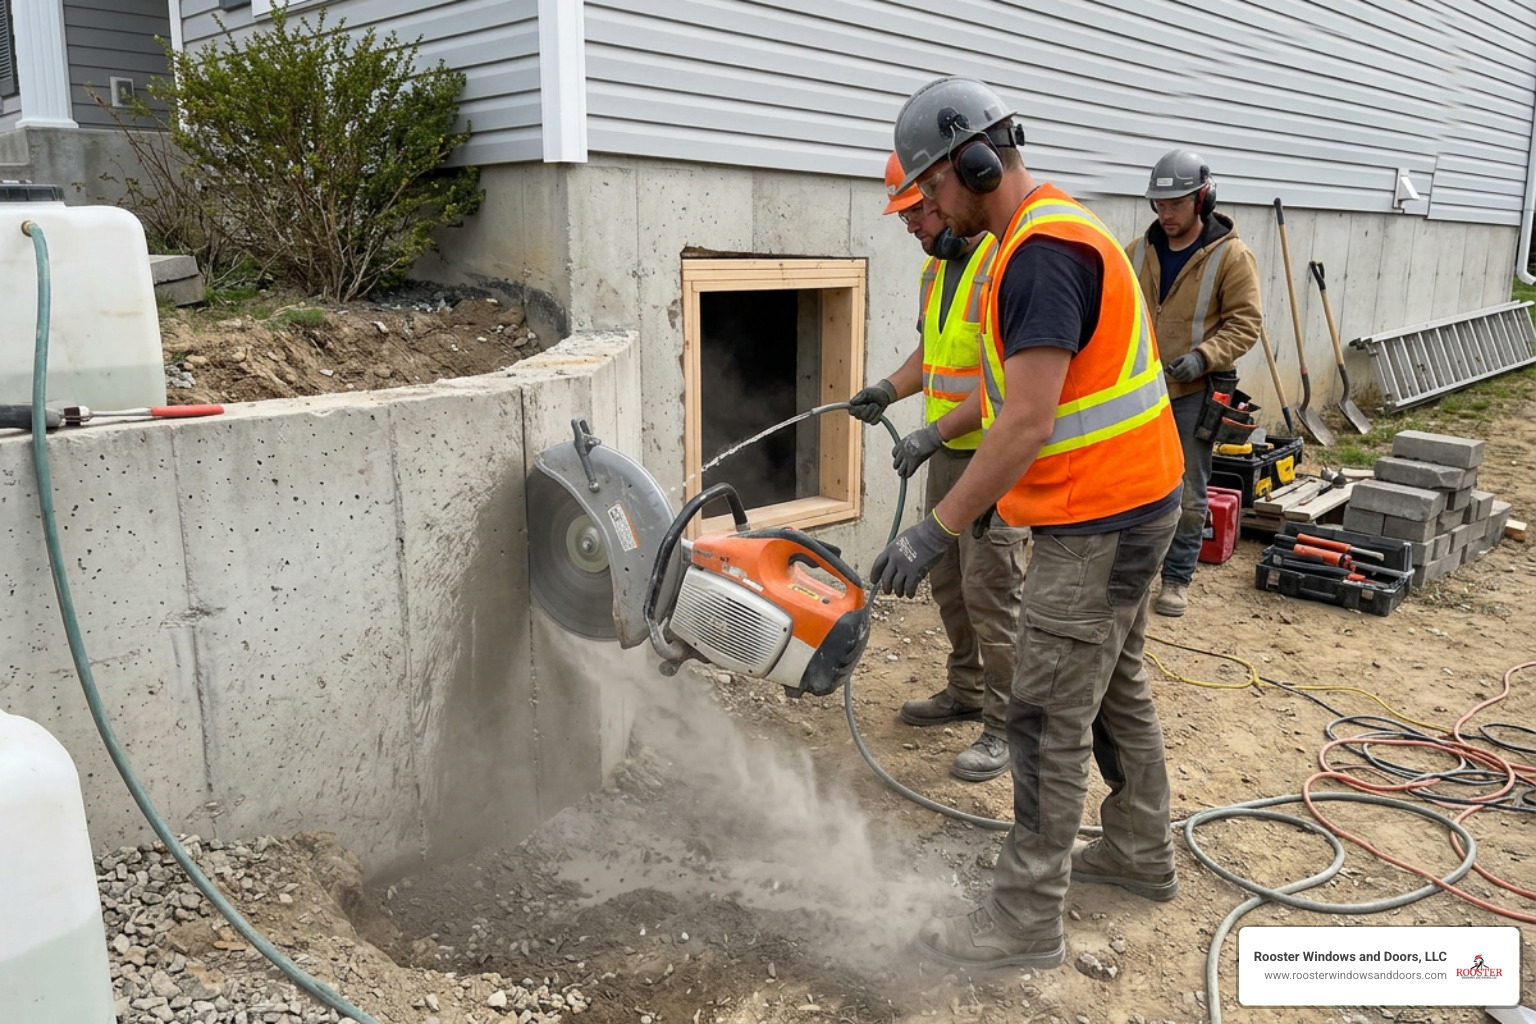
Step-by-Step Guide to Installing an Egress Window in Basement
Here is how a professional installation unfolds:
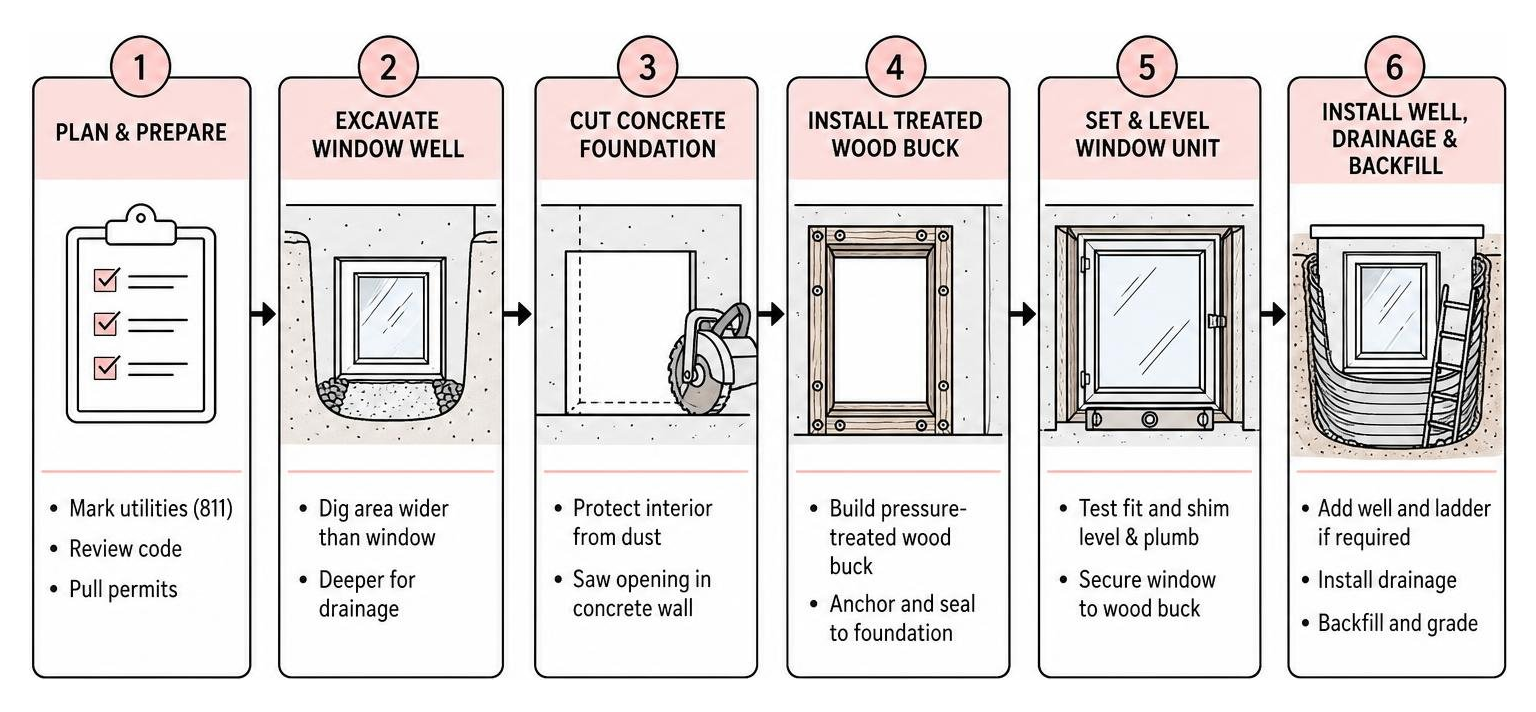
- Utility Marking (811): Before any shovel touches the ground, we contact JULIE (the Illinois one-call utility notification system) to mark all underground gas, electric, water, and fiber-optic lines.
- Excavation: We dig a hole roughly 4 feet wider than the planned window and about 12 to 19 inches deeper than the bottom of the window frame. This extra depth is essential for establishing a proper drainage field.
- Concrete Saw Cutting: We protect the interior of your basement with heavy plastic sheeting to contain dust. Using a professional-grade hydraulic concrete saw with a diamond blade, we cut the opening from the exterior. For poured concrete walls, we make clean, straight cuts; for concrete block walls, we ensure the cuts follow the mortar lines where possible or use a concrete chainsaw for precise corners.
- Framing (The Window Buck): We install a pressure-treated wood frame (called a window buck) into the raw concrete opening. This frame is securely anchored with concrete screws and sealed to prevent air and water leaks.
- Setting the Window: We test fit the window, place shims to ensure it is perfectly level and plumb, and secure it to the wood buck. For a deeper technical breakdown of this step, see our Egress Window Installation Complete Guide.
- Insulation and Sealing: We apply a low-expanding polyurethane foam around the window frame, followed by high-grade exterior silicone caulk.
Waterproofing and Drainage Best Practices
Waterproofing is where many DIY projects fail. Because a window well is essentially a giant bucket attached to your foundation, it must have a reliable way to shed water.
First, we install a dedicated drainpipe at the bottom of the well. This pipe must run down to the level of your home’s foundation footings and connect directly to your existing perimeter drain tile system (weeping tile).
Second, we fill the bottom 12 inches of the well with clean, 3/4-inch washed gravel. This gravel layer acts as a rapid-drainage filter, preventing soil from clogging the drainpipe.
Finally, we apply a heavy-duty self-adhering flashing tape (sill pan flashing) along the bottom and sides of the window opening before installing the window. This ensures that even if water somehow gets past the outer seals, it is directed harmlessly outward rather than soaking into your basement walls. For specialized regional advice on local soil conditions and moisture management, read our guide on Egress Window Installation Chicago.
Frequently Asked Questions About Basement Egress
Do I need a permit to install a basement egress window?
Yes, absolutely. Installing an egress window in a basement involves making structural modifications to your home’s foundation wall. Every municipality in our service area—from Lake Forest and Highland Park to Cary and Woodstock—requires a building permit for this project.
The permit process ensures that the structural integrity of your home is maintained (for example, verifying if a structural header is required to support the floor joists above the new opening) and that the window meets all safety codes. Attempting this project without a permit can lead to heavy municipal fines, stop-work orders, and major headaches when you eventually try to sell your home.
How long does a typical professional installation take?
A professional installation team can typically complete the entire project in 1 to 2 days.
On day one, we handle the excavation, concrete cutting, framing, and window installation to ensure your home is completely sealed and secure before we leave. On day two, we finish the exterior well installation, hook up the drainage system, backfill, grade the surrounding soil, and complete the interior trim work.
What are the most common mistakes to avoid during installation?
- Ignoring Utility Lines: Digging without calling 811 can lead to catastrophic utility line breaks, expensive repair bills, and serious physical danger.
- Poor Drainage Design: Failing to connect the window well to the home’s drain tile system or omitting the gravel drainage bed will inevitably lead to water pooling in the well and leaking through the window.
- Incorrect Sill Height: Forgetting to account for the thickness of the future finished flooring can result in a finished sill height that is higher than 44 inches, instantly failing inspection.
- Using the Wrong Caulk or Foam: Standard expanding foam can warp vinyl window frames, preventing them from opening. Always use a low-expansion foam designed specifically for windows and doors.
Conclusion
Installing an egress window in a basement is one of the most impactful home improvement projects you can invest in. It protects your family by providing a safe, reliable escape route in an emergency, floods your lower level with beautiful natural light, and instantly boosts your home’s equity by turning unfinished space into a fully legal, conforming bedroom.
Because this project involves structural foundation modifications, heavy equipment, and precise waterproofing, it is a task best left to specialists. At Rooster Windows and Doors, LLC, we pride ourselves on delivering flawless, energy-efficient window installations tailored to the unique architectural styles and local building codes of our Chicagoland communities.
Whether you are in Mundelein, Lake Zurich, Buffalo Grove, or Chicago, we are here to help you unlock the full potential of your home. To schedule a professional site assessment and get a detailed project quote, visit our Egress Window Installation service page today.
